New Tech: VM Essentials – A more serious Deployment
After creating a fairly simple, but working HPE VM Essentials deployment (see https://my-sddc.net/new-tech-hpe-morpheus-vme/), it’s time to make a more serious deployment. In the previous blog I took networking and storage for granted, but in real life scenarios, those topics need a more serious approach. So I am making a “design” for a small customer, that will have three VME hosts, use iSCSI, NFS ánd local storage for their VM’s and use VLAN’s to differentiate between different traffic flows.
I am also using pfSense to do routing between the different VM’s. And I am reusing an old friend, the DL380 Gen8 that was not upgraded recently, for the VCF lab, but is still very well capable of running a nested HPE VME environment.
So I am aiming for something like this (and I do need some extra storage):
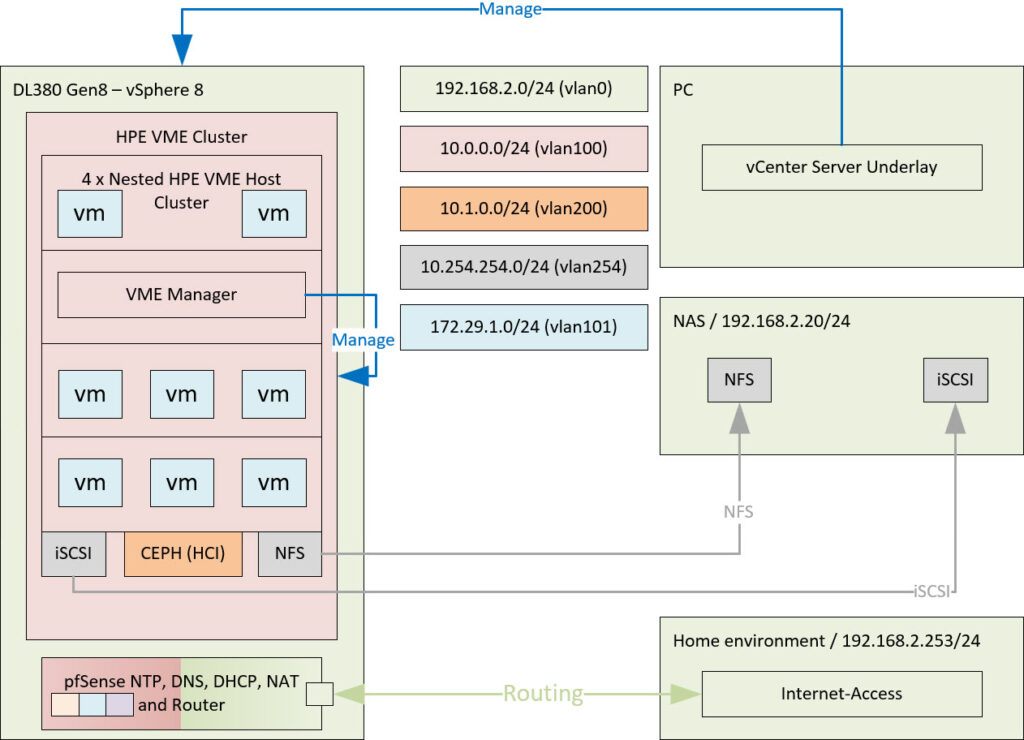
And from an internal network perspective, it looks like this:
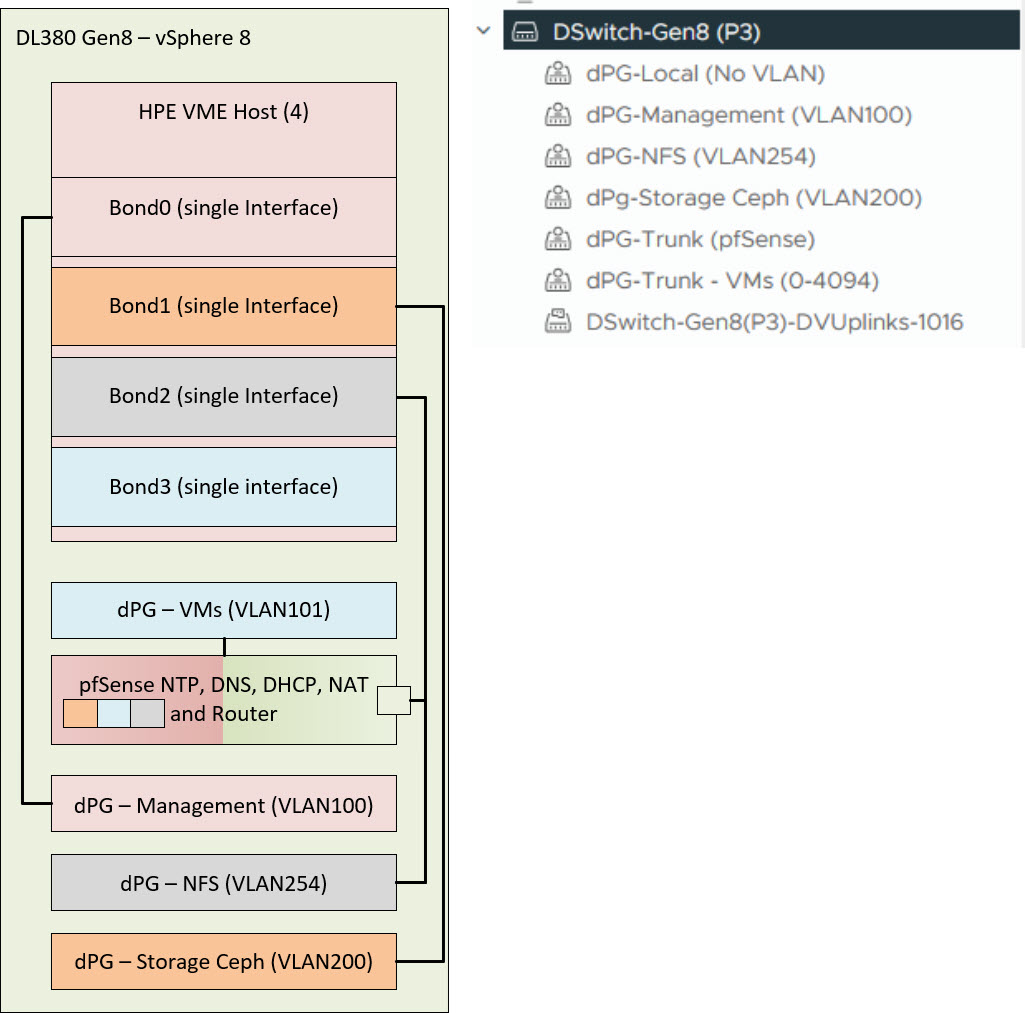
A nice combination of vSphere and HPE VME, so to say.
What I will be doing in this blog:
- Build the constructs in vSphere and Create the HPE VME VMs
- Deploy HPE VME Manager
- Create a Group, Cloud and Cluster
- Move Manager VM to Cluster
- Migrate Manager VM to Ceph Storage
- Live Migrate Manager VM
- Connect NFS Storage
- Create new Image (template)
- Create new VMs from image
- VM Failover
- Final Thoughts
Build the constructs in vSphere and Create the HPE VME VMs
First, we build all the constructs in vSphere (which I am not going to show here), next, we install some new VM’s with Ubuntu 24.04, as I already did in the previous blog.
These are the specs that I am going to use to build the HPE VME nested hosts:
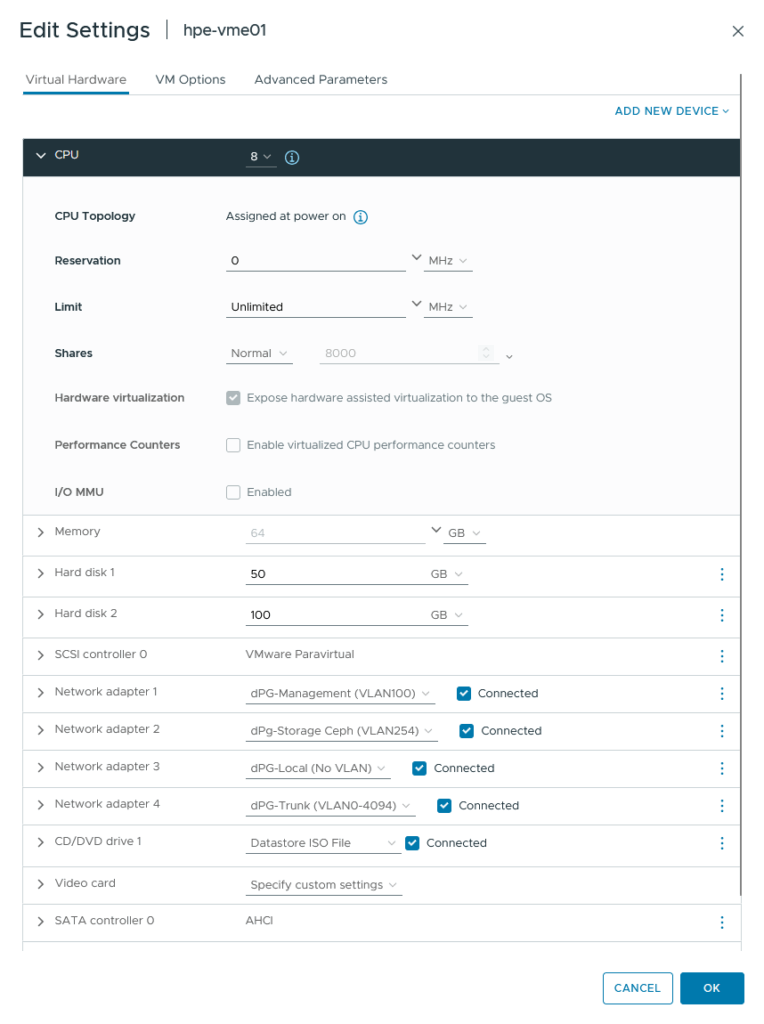
(all of the memory is reserved, to save on storage space, which is a little bit scarce, while memory is not)
All of the nics will be used in a bond. The 100 GB hard disk will be used for Ceph (and is currently running on a spinning disk), the 50 GB is for OS and is running on SSD. After this, the installation of Ubuntu is the same as in the previous blog, except for the networking config:
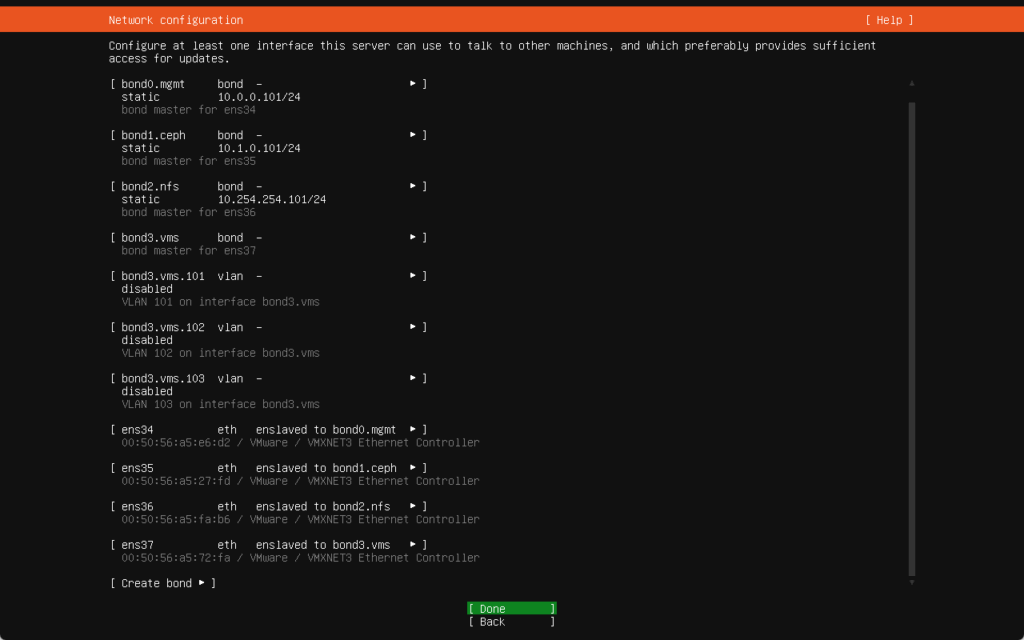
So I created:
- bond0-mgmt: Attached to a VLAN-based port group (VLAN 100) (so no VLAN-ID configured within the host), for management. This will also be used for the VME Manager Appliance.
- IP-Address: 10.0.0.10x/24,
- Gateway: 10.0.0.254 (pfSense) and
- DNS: 10.0.0.254 (also on the pfSense)
- bond1-ceph: Earmarked for Ceph storage traffic, attached to a dedicated VLAN port group. (10.1.0.0/24)
- bond2-nfs: Earmarked for storage traffic, attached to a dedicated VLAN port group (10.254.254.0/24)
- bond3-vms: Contains three VLAN interfaces to be used for VM’s:
- bond3-VMs.101
- bond3-VMs.102
- bond3-VMs.103
For storage I use the 50 GB disk for the Installation and leave the 100 GB disk for Ceph (later on).
After creating the first vme host (including the installation of the HPE VME software), I cloned it three times, not using a “customization”, because the networking config is a little tricky to do with a customization. So after cloning I perform the following actions:
- Change the name:
sudo hostnamectl hostname hpe-vme0x - Change the IP-Addresses in the file “/etc/netplan/50.-cloud-init.yaml” to the right addresses.
- Remove /etc/machine.id
- Run
systemd-machine-id-setupto create a new machine.id file. This will reset the mac-addresses on the bond adapters. Otherwise we get mac-address conflicts. - And reboot the VM
Deploy HPE VME Manager
After that, the VM is unique and can be used. So I installed the HPE VME Manager VM on one of the hosts, with the following settings:
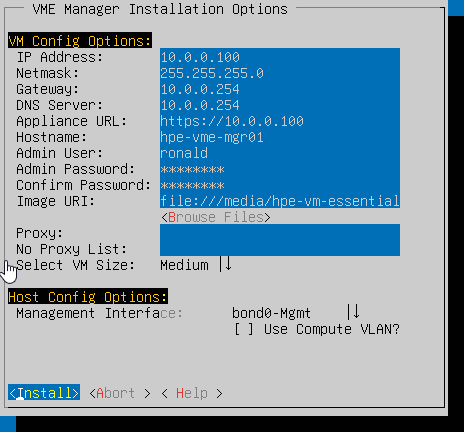
(don’t forget to set the cpu on the VM to:

(I forgot that the first time and then the VM deployment will stop at 99% and shows a message (but doesn’t stop on an error).
And when that is done, we should be able to access the appliance, on it’s IP-Address of 10.0.0.100 (if NAT or routing is configured correctly):

(again loading will take some time, even though the underlying hardware is now a lot stronger). After loading is completed, we can configure the Manager (same as we did in the previous blog, at: https://my-sddc.net/new-tech-hpe-morpheus-vme/ )
Create a Group, Cloud and Cluster
Also, done in the previous blog, but this time, the cluster creation will be a little different, because of the new Network and Storage setup.
Creating Group and Cloud is the same however, so I’ll just say, I have created “Ronald-Group” and “Ronald-Cloud” and next up, I’m going to create “Ronald-Cluster”:
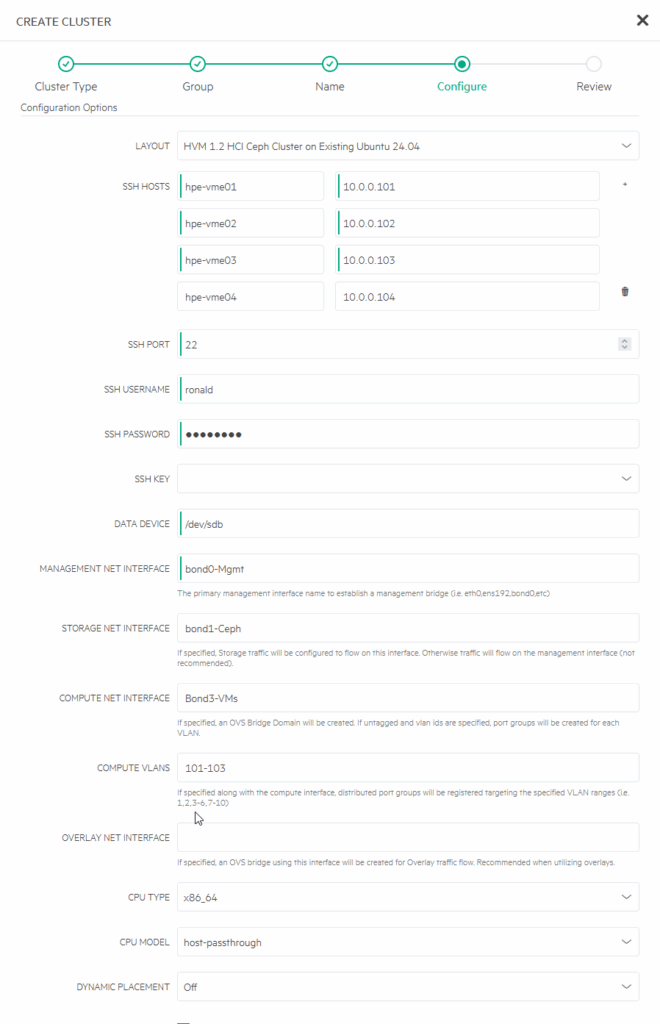
So, for network configuration, I select bond0.mgmt for Management, bond1.ceph for Storage, Ceph related (for NFS I will use bond2.nfs and bond3.vms for Compute Net Interface and the VLAN’s 101-103 as Compute VLANs. At the moment of creating I am not sure if this makes a part of my previously done work redundant or that this is not necessary, but best way to find out, is to try… (I did create a snapshot, just in case).
One remark here, as you might see on the picture, I put in a faulty Compute Net Interface. I used capital B instead of lower-case and that failed the first attempt. It then defaults a lot of fields back, that I need to fill in again. That would be a thing that could be done better for sure. But after correcting it, the installation of the cluster went through successfully:
After this, I checked on one of the hosts, to see what had happened to the network-configuration and found the following:
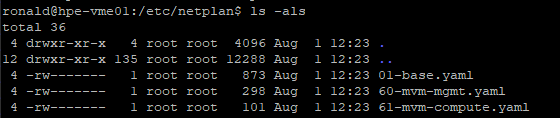
And the content of each of the files:
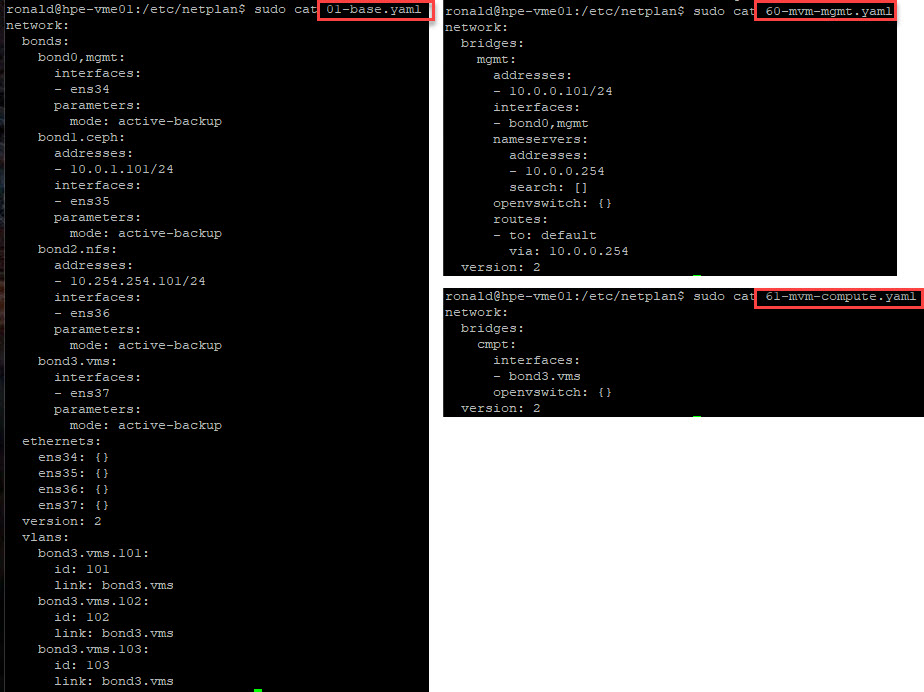
So it seems that everything has been changed by VME, but the information is still there. Although we do now seem to have two openvswitch based bridges in our environment.
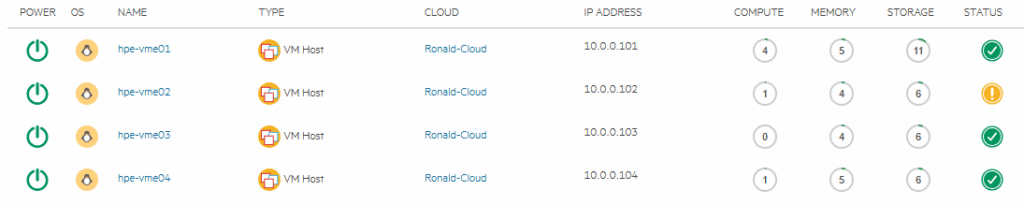
For now, I am going to leave it like this. I do want to take a look at the storage, from a cluster perspective:
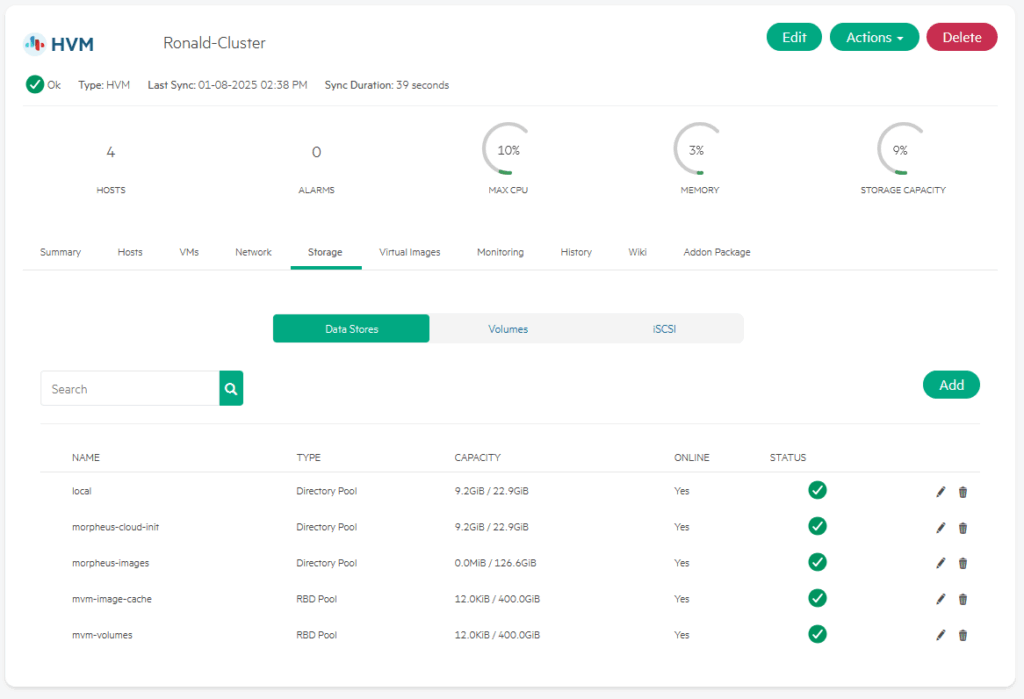
I can see the 400 GB (four disks times 100 GB) of local storage that is combined into a Ceph datastore, that I can use.
Move Manager VM to Cluster
Next step is to make the hpe-vme-mgr01 vm a first class citizen, by making it a managed VM. For this I perform the following activities:
- Convert to Managed
- Move VM to shared storage
Finding the VM is the first step. It is both in the “Virtual Machines” tab of the Compute and in the “Discovered VMs” tab on the host it is running on:
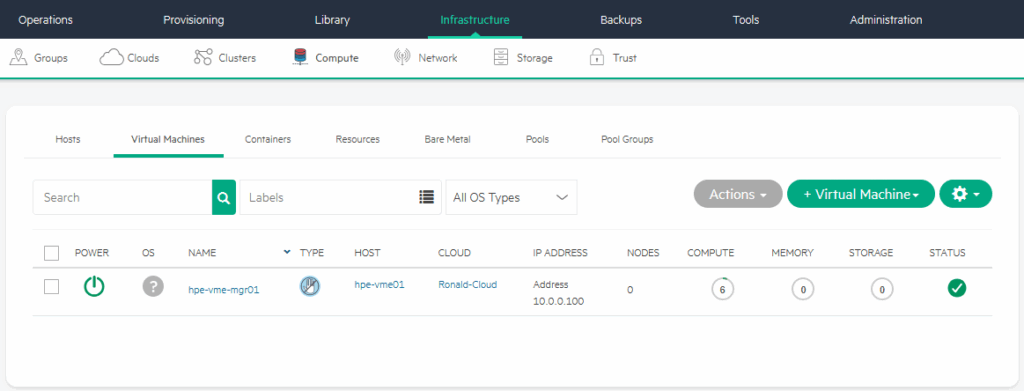
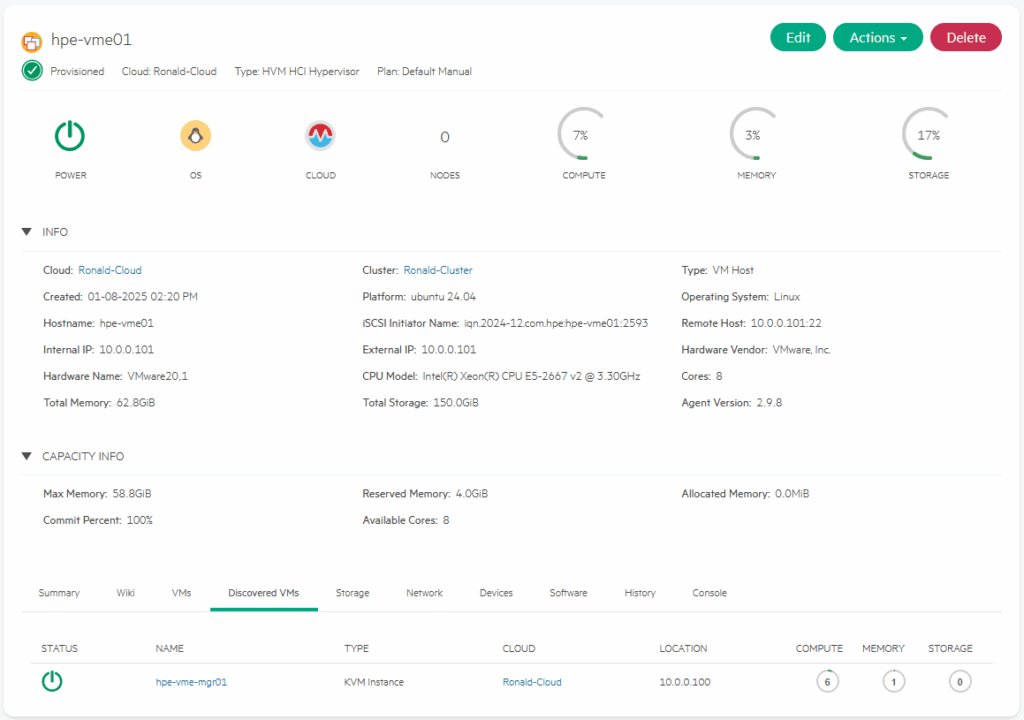
It is however not in the VM’s list on the host or the cluster it is running on:
So that is what we are going to make happen. We select the VM (from either screen) and click on:
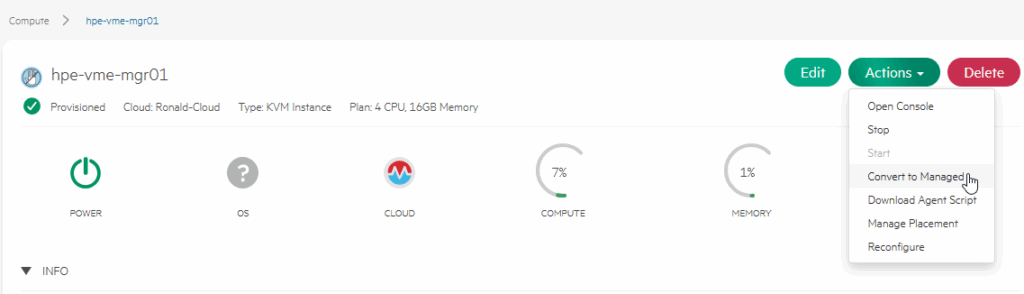
“Convert to Managed”.
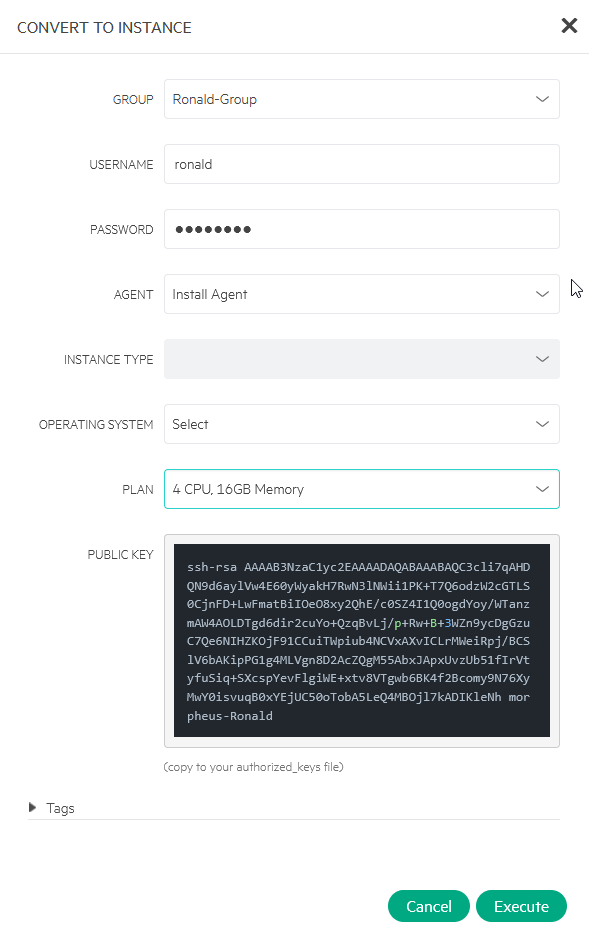
We have to select “Install Agent” and fill in username and password. We also have to select a Plan. In this case, the VM fits an existing plan, but if it didn’t, you can pretty easily create a new Plan that would fit (see here for a tutorial about that: https://www.hpe.com/h22228/video-gallery/us/en/v100006432/video?jumpId=in_videogallery_9ab96a37-4dd6-4479-97b1-fb8d75e38783_gaiw).
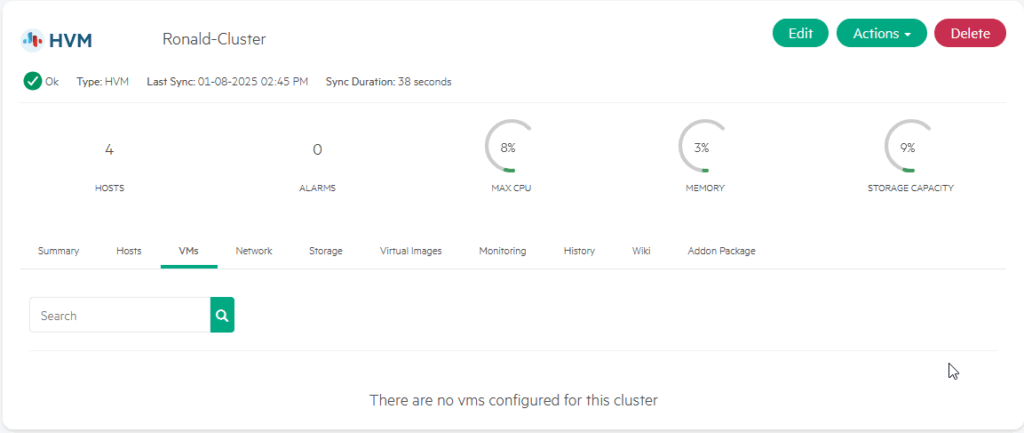
After filling all this out, we click on Execute and away it goes. After the succesful installation of the Agent (or not, I did not get a message about that), it shows up in the cluster, under VMs:
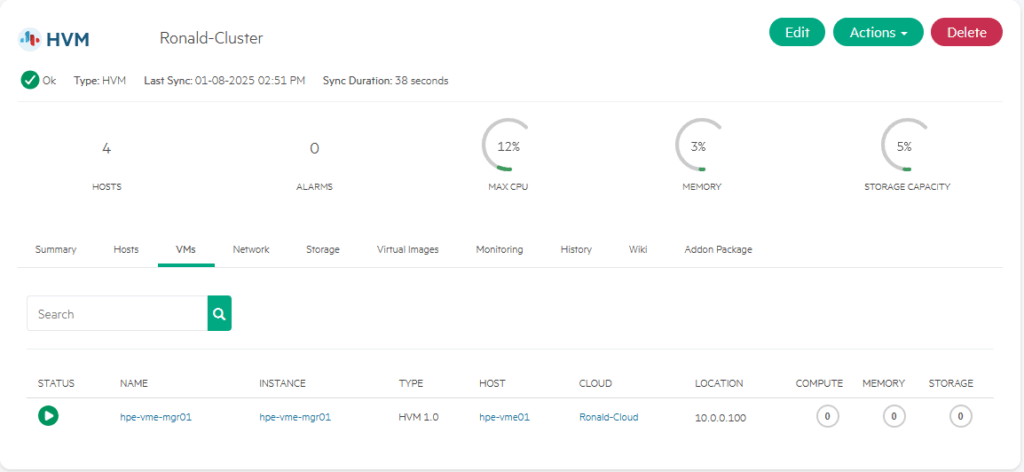
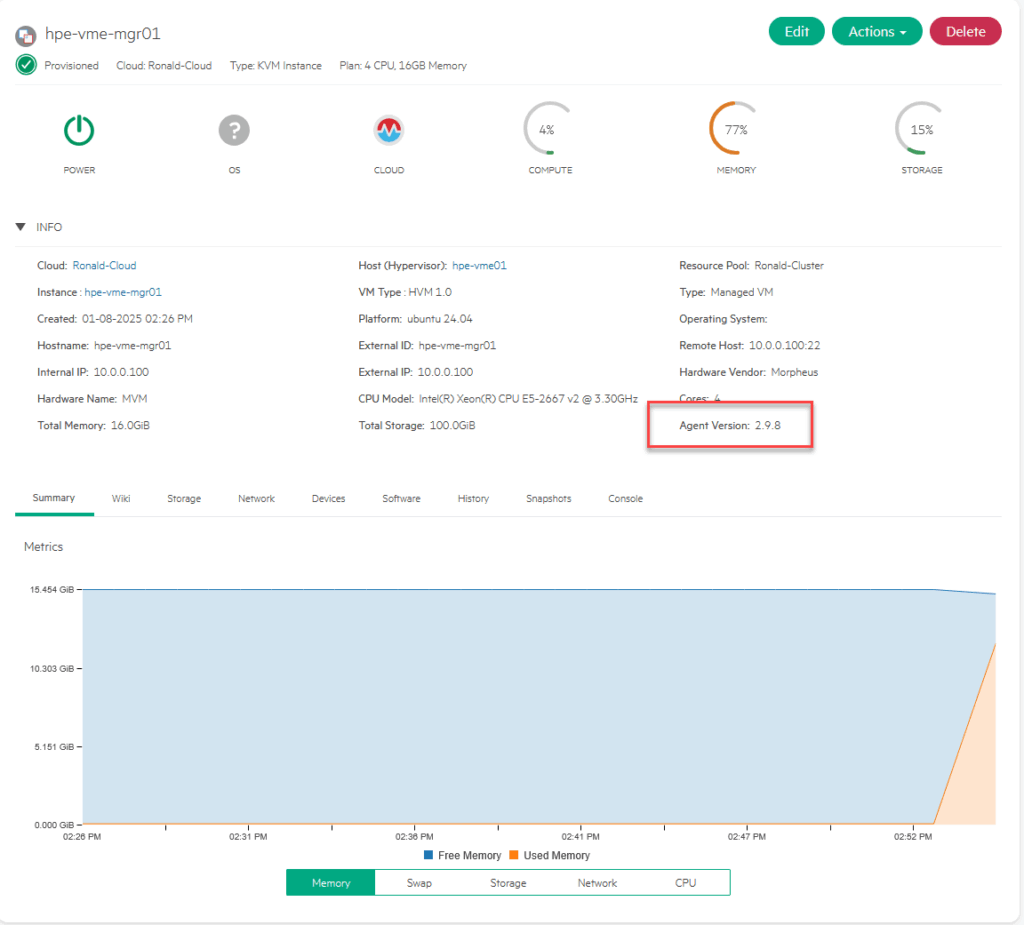
It does however show the agent installed, so I assume everything is okay:
Migrate Manager VM to Ceph Storage
Next step is to move the Manager appliance to shared storage, in order to get some real virtualization functionality under it, like a vMotion Live Migration and such.
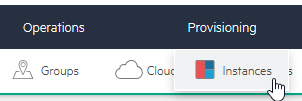
For this, we go to the “Instances” part of the VME dashboard:
and as a first action, eject the cd-disk:

After that, I can choose “Reconfigure” (one option above the “Eject Disks” command), and choose a different storage location for my VM:
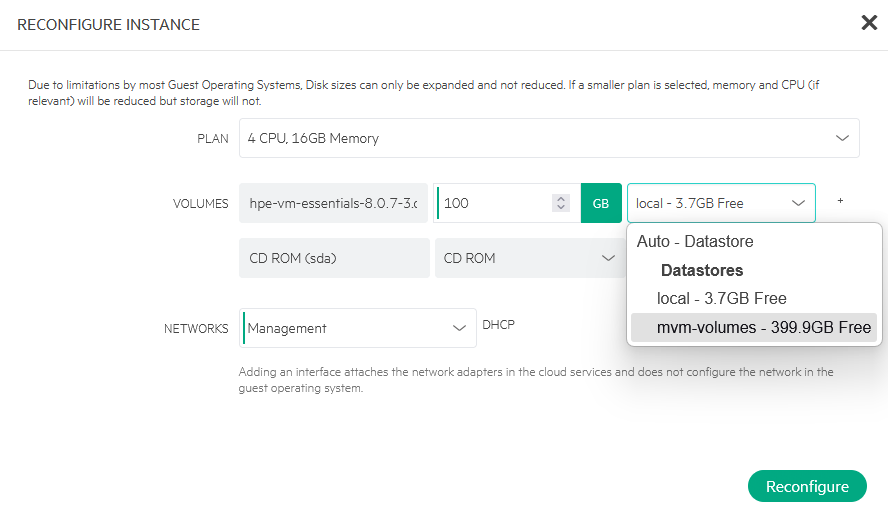
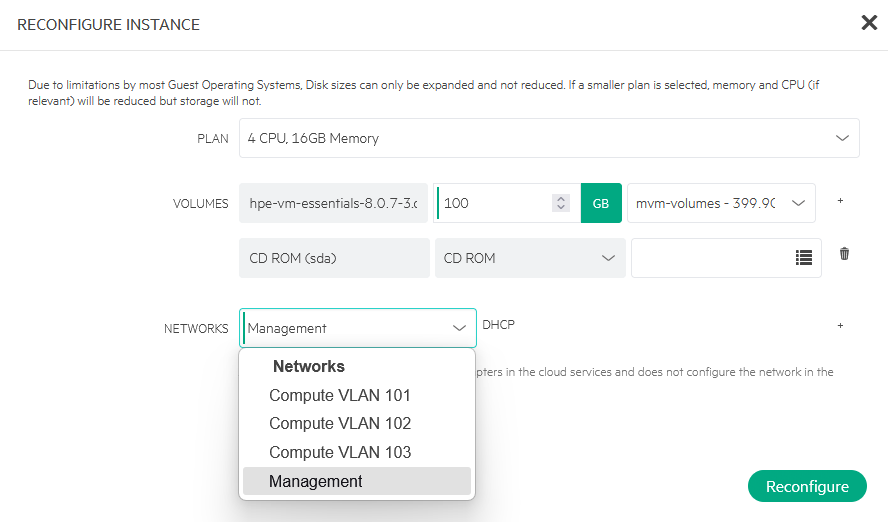
In my case I am moving it to the “mvm-volumes” datastore. I can also configure the attached networks here, I can see the available networks in a drop-down (not changing this, though):
After selecting the other datastore and clicking “Reconfigure”, the data is moving to the other datastore:
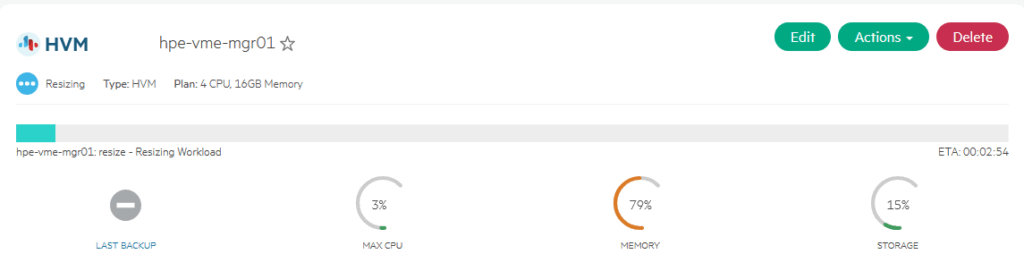
After the VM is moved (took about , I can disable the local datastore, so it will not be used any further.
On one of the hosts, I can see the stats for the ceph volume:
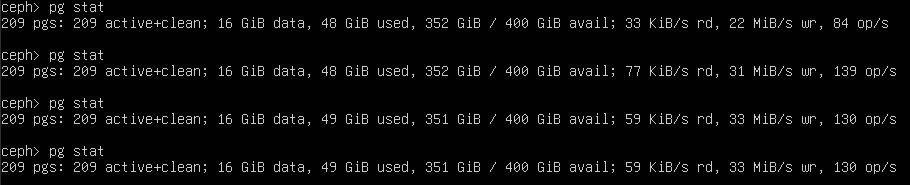
(start sudo ceph to get into this interface)
It’s not super fast, but that’s because the ceph-disks are all located on (the same) 450 GB spinning disk… And I can see it being pretty busy, on the VMware level:
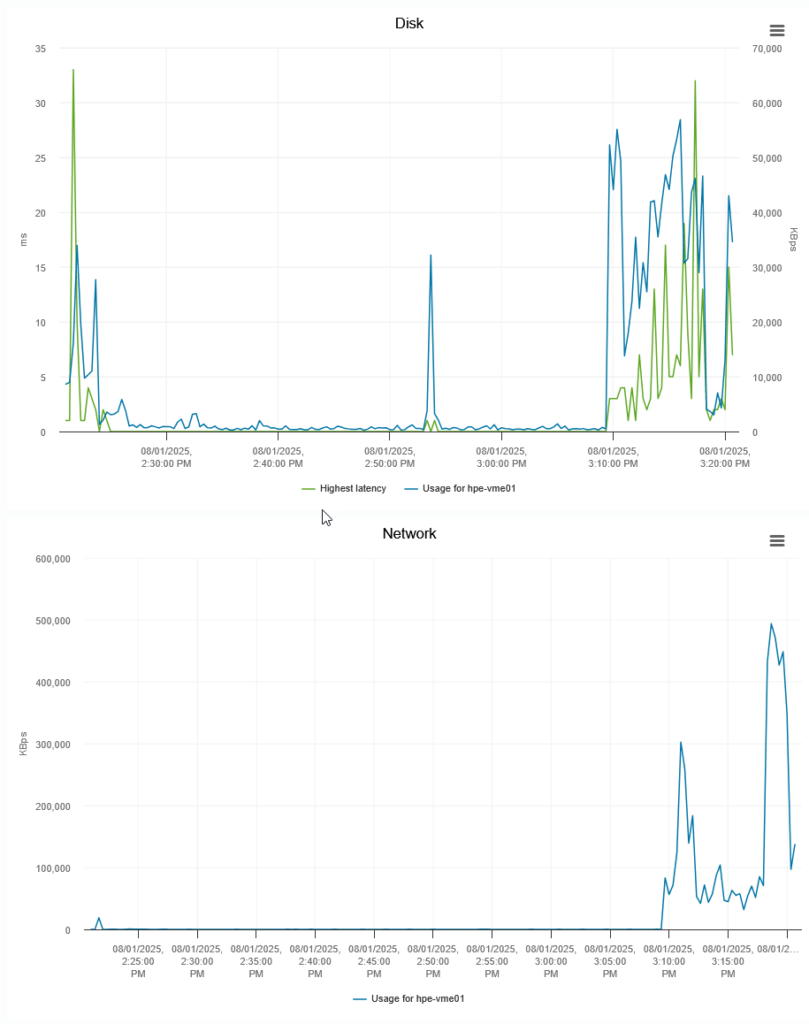
Nice to see that the network througput well exceeds the 1 Gb/s interfaces installed in the physical server, but that makes sense, since all VM’s are running on the same host :).
In the end, the move took 11 minutes and change:
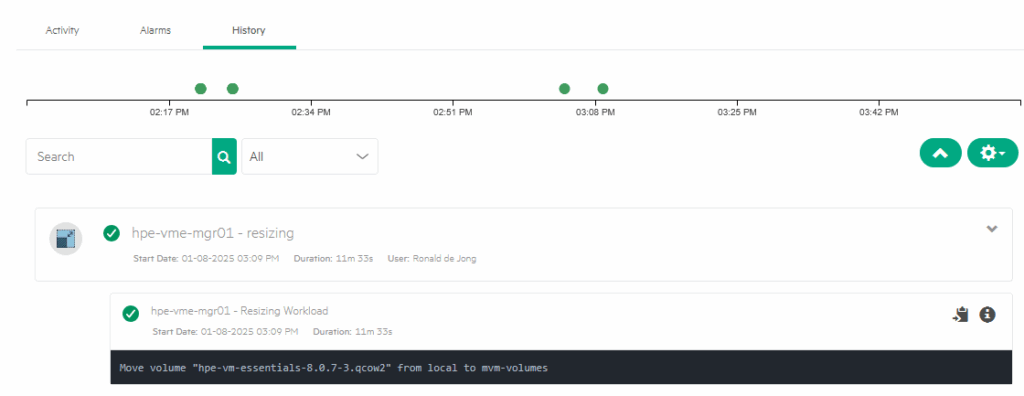
and ceph also shows it is done:

So it is placed on three different nodes, as I can deduct from the 55 GiB size, where 167 GiB is used on a physical level.
Live Migrate Manager VM
Well, I have been around the virtual block for a while now (I started around 2004/2005 with ESX 2.x and Virtual Center 1.5 if I recall correctly), but I think everyone in the virtual realm remembers the feeling they got when they first saw a live migration (then, vMotion, since VMware was the only product that could do that).
Of course, if you came a little later to the party, it might not have been so spectaculair, but when you came from a whole lot of physical servers, running OS’s that were pinned to the same hardware, moving a “virtual machine” from one physical box to another was astonishing.
So let’s see how VME does that.
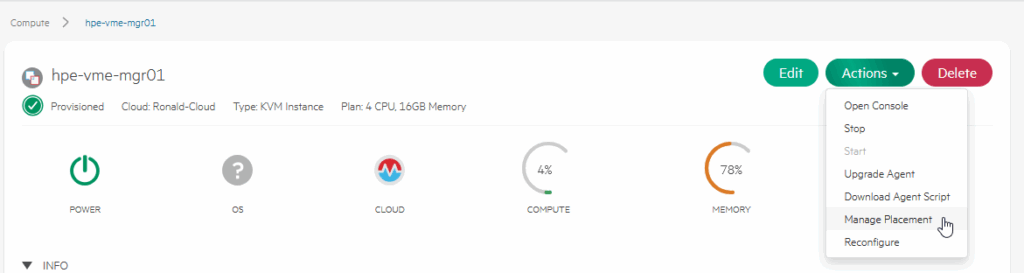
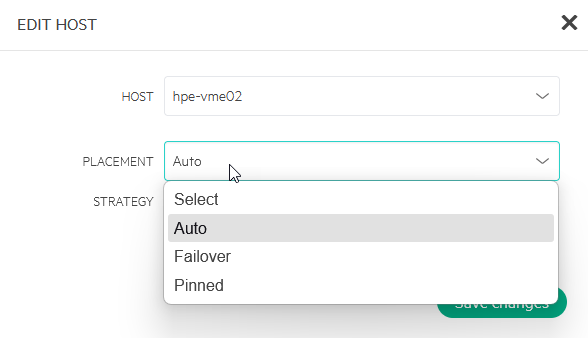
With the VM selected, we choose “Manage Placement”. There we have several choices. We can choose to “pin” a VM to a specific host, we can have it automatically be selected (sort of like DRS) or we can manually select another host.
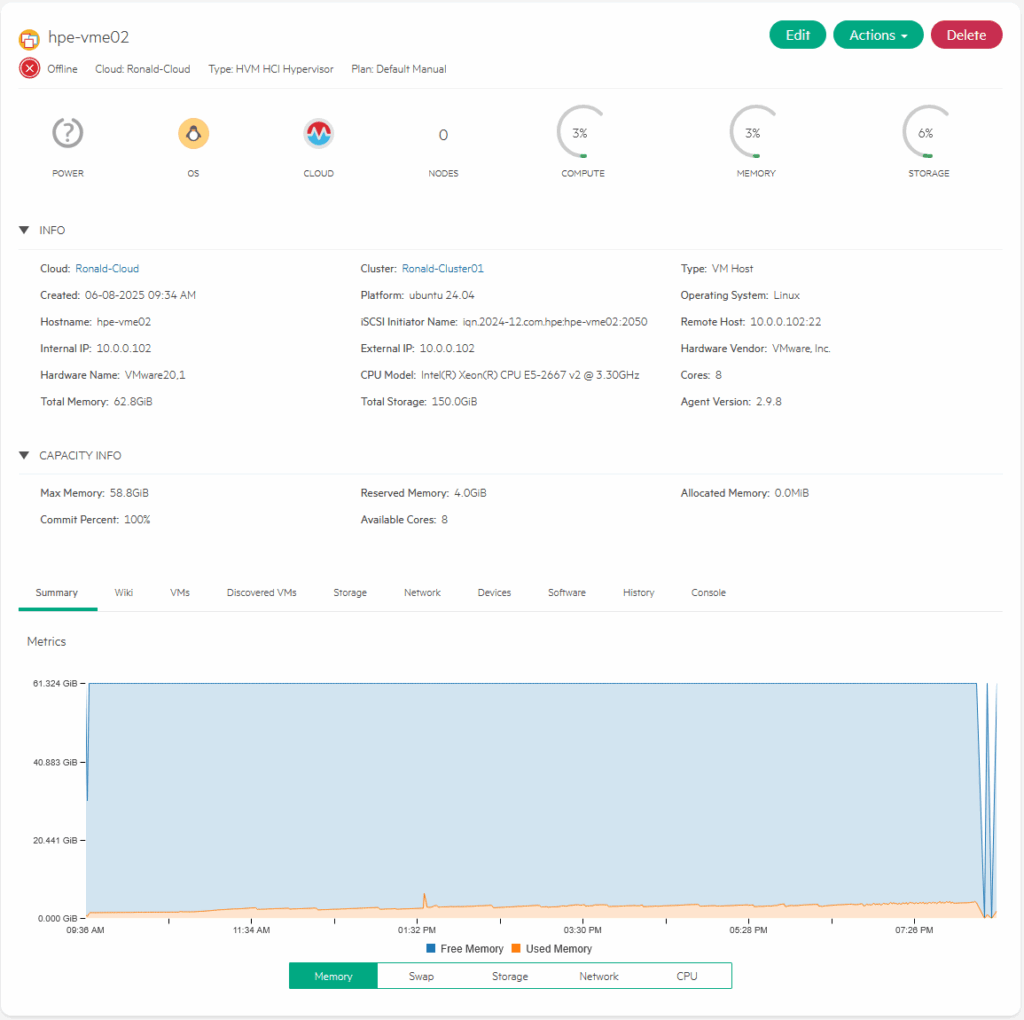
I choose to move it to hpe-vme02 and leave the Strategy on Auto (I am going to put the hpe-vme02 into Maintenance Mode in the next step and see it move again):
We can see the Activity being performed:

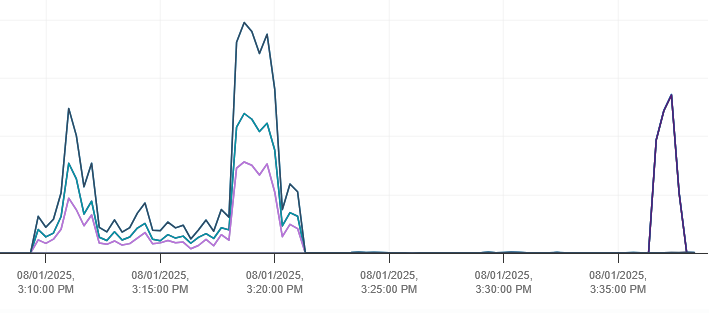
We can also see the “network” being used on the VMware layer:
And after a minute and a half, the VM is migrated to hpe-vme02.

Next step, put hpe-vme02 into maintenance mode and see the VM move again:
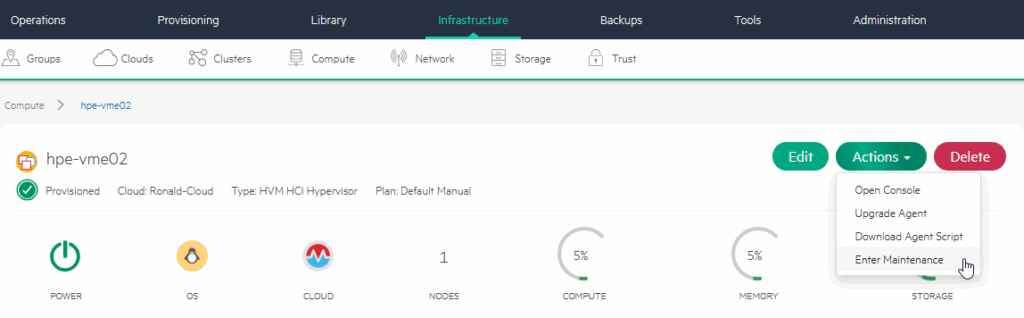
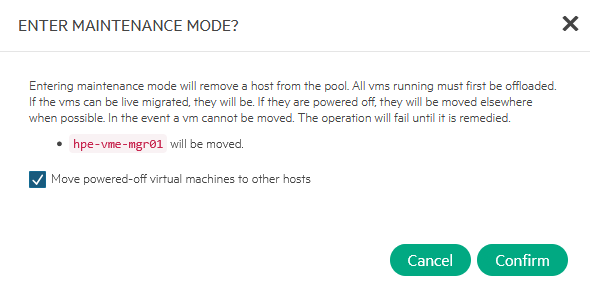
It is being moved back to hpe-vme01:

After the move is done (little over 1 minute), the host is placed into Maintenance Mode:
We will take it out again, this is pretty quickly done (6 seconds).
Connect NFS Storage
Next up is connecting NFS as a storage connection. I do have a Synology NAS in my network, so going to leverage that.
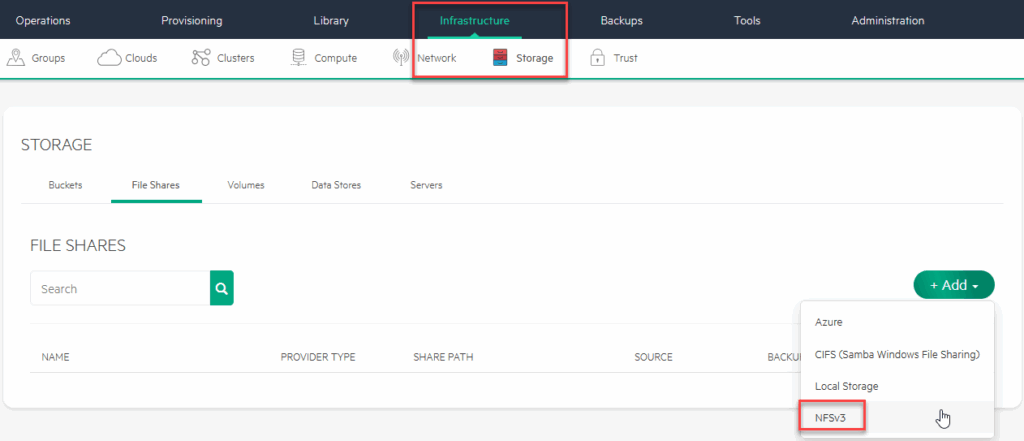
The NFS configuration on the Synology are out of scope for this blog, but they are configured and ready to use. The next step is to create an NFSv3 File Share :
There I will connect to the NFS share and make this share the default for creating Images:
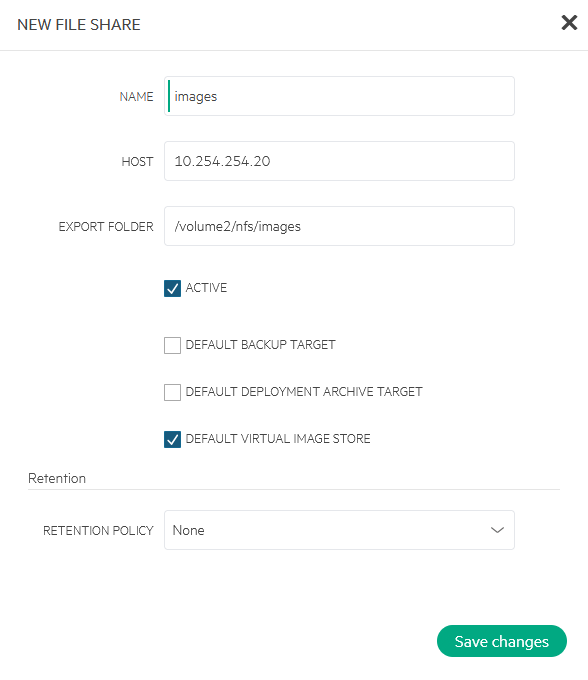
After that, I can create a Virtual Image.
I will also create an NFS share for VM’s:
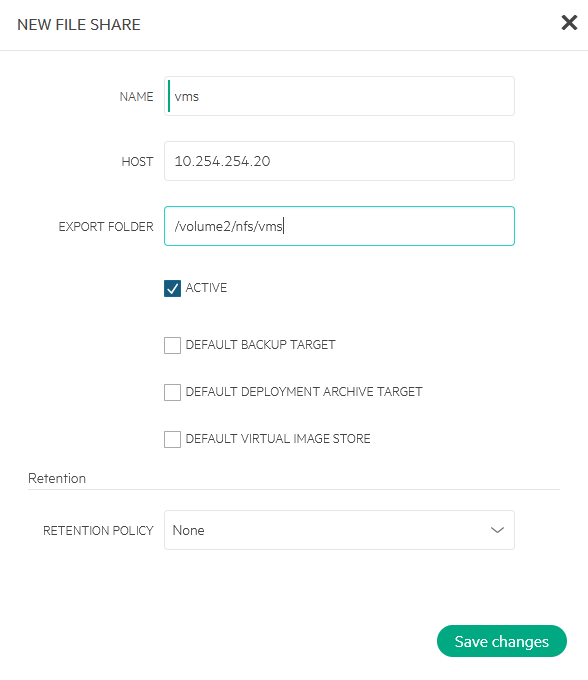
What I didn’t expect, but is visible when looking at the connections, is that the connection to the NFS share is done from the Manager, not from the hosts. Will see what happens when I create VM’s on the device, if the connection will also be made from the hosts that the VM’s run on.
Create new Image
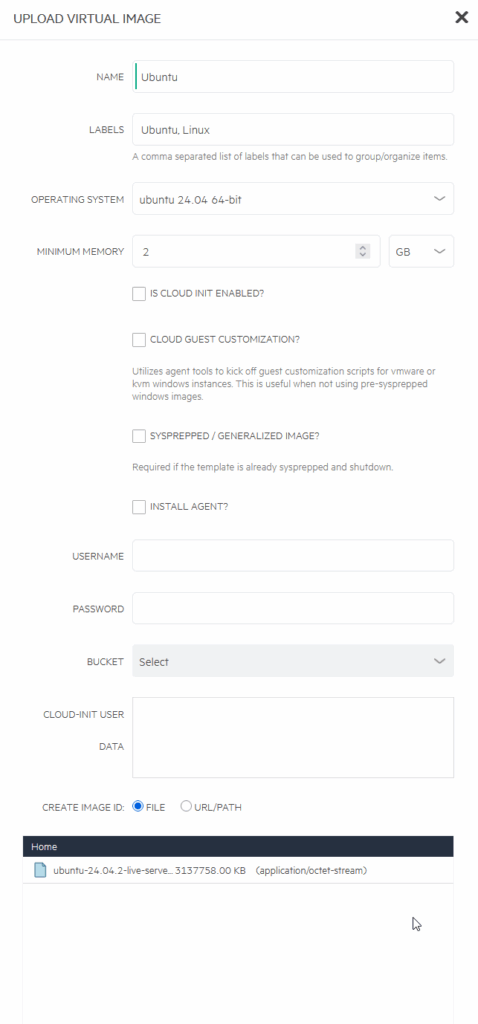
So I can go and create an Image, based on the (already downloaded) Ubuntu 24.04:
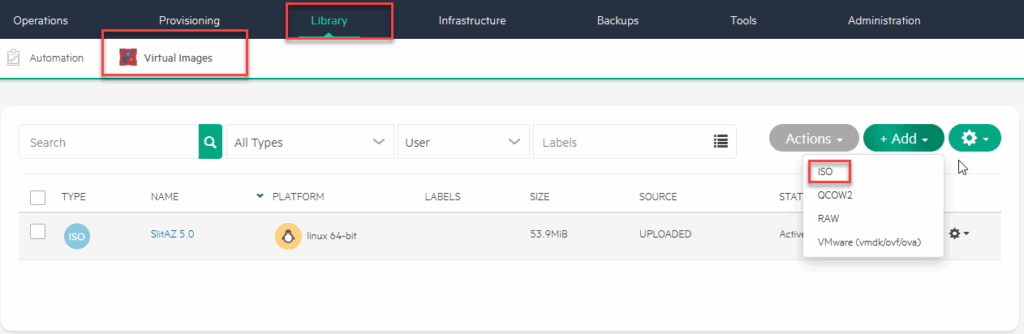
This image will be used to create a VM which will be converted to a template, so for now, I am just filling in the basic fields needed.
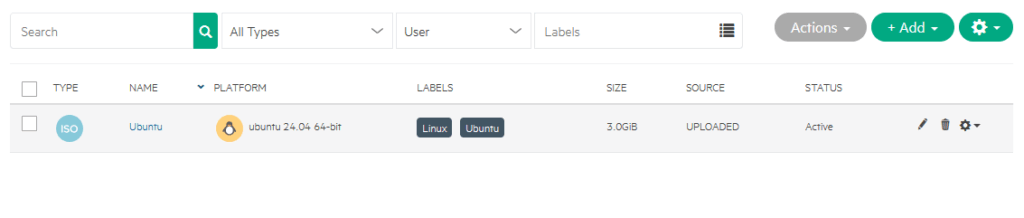
As you can see, the labels are selectable when you look for the image you need:
From this image, I am creating a Virtual Machine (or, Instance):
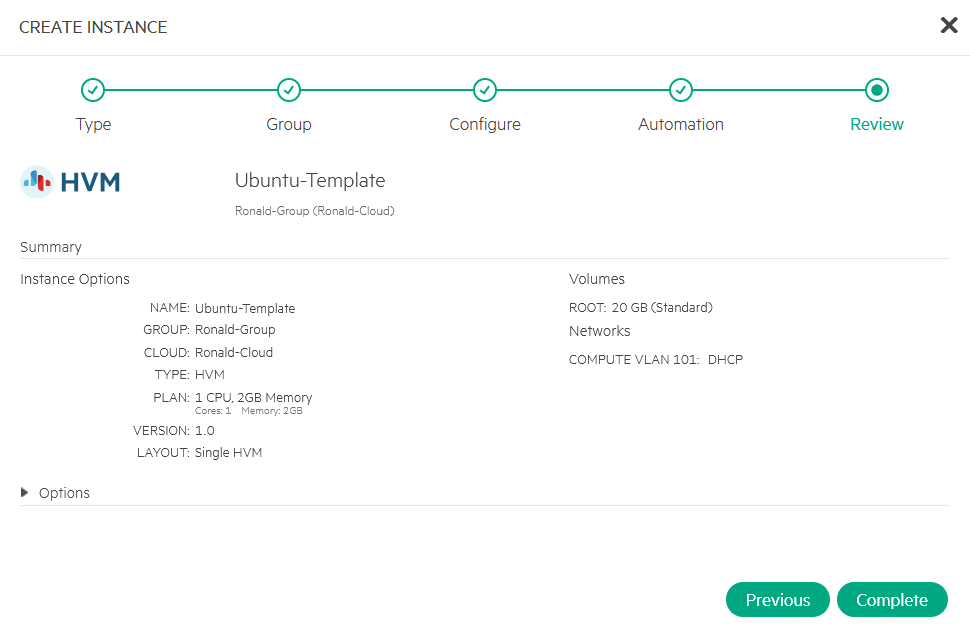
After that has completed, I spin up the VM and configure it to be used as a Template.
Note: I tried a lot of things to get this network setup to work. I tried working with promiscous mode within the hpe-vme virtual machines, and a lot of other things, but for now I chose to move forward and use an already existing vlan (100) that works.
All of this for the purpose of moving forward. I will definitely try and find out why this nested setup won’t work, but since this is not something we will encounter in a production environment, it isn’t worth spending too much time on now.
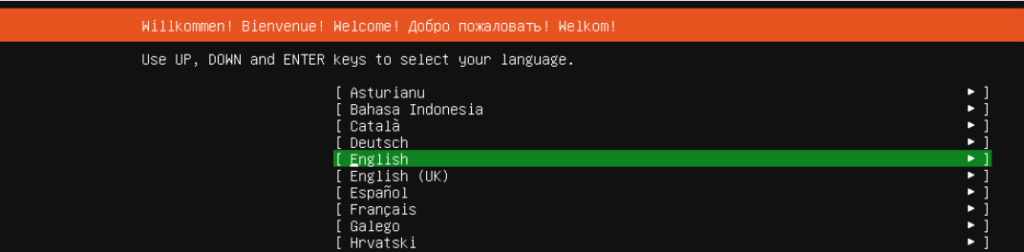
We install Ubuntu as we did earlier, when configuring the hosts, from the wizard:
And after that has completed, we install the qemu agent and after that we make the new VM into a Template:
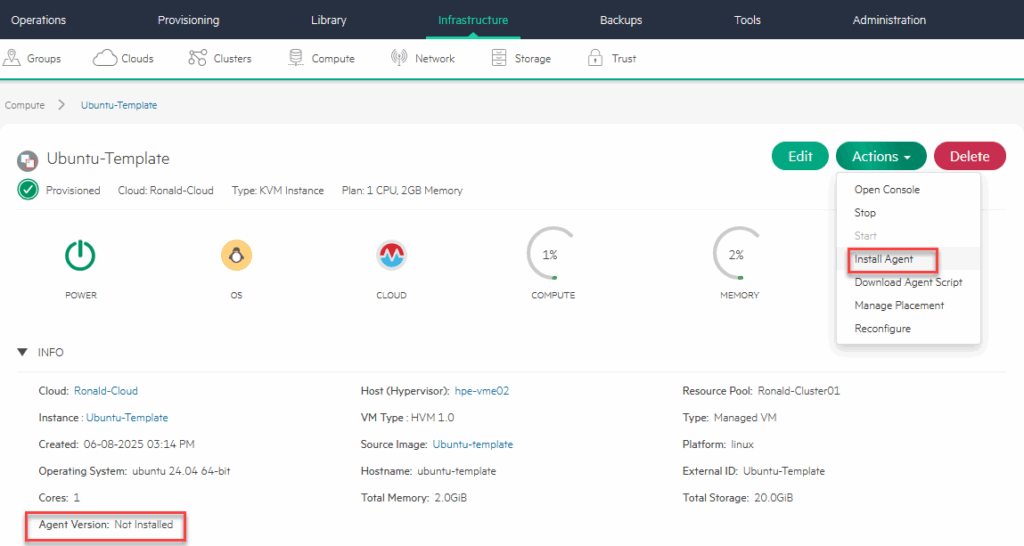
(afterwards it will show the version of the agent).
Other changes that need to be made are documented in: https://docs.morpheusdata.com/en/8.0.7/integration_guides/Clouds/vmware/vmware_templates.html (ignore that this handles around VMware, it’s also valid for HVM VM’s).
And I added the qemu guest agent, through:
sudo apt install qemu-guest-agent
Then I make a template out of the VM:
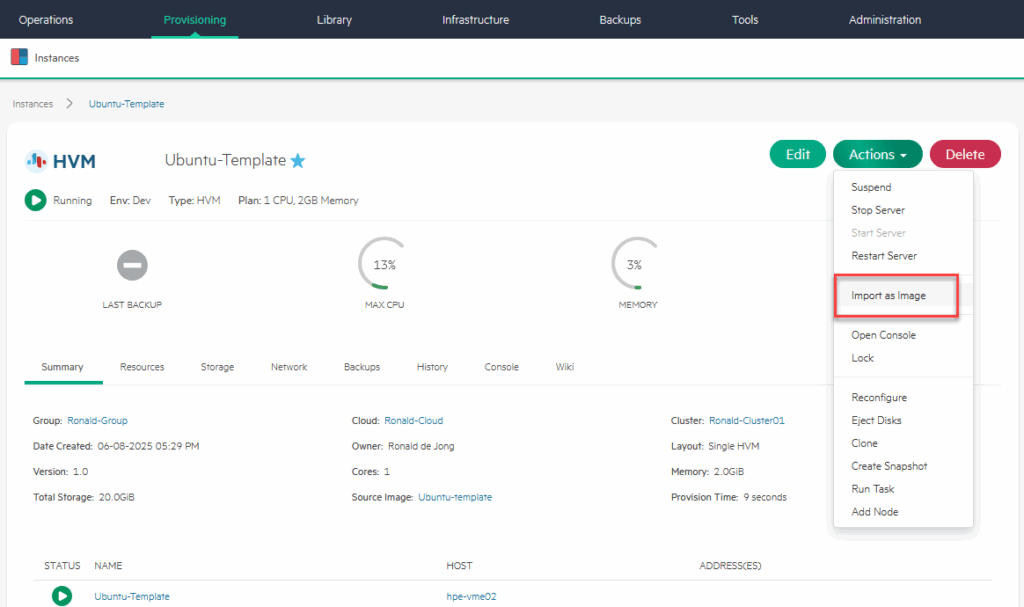
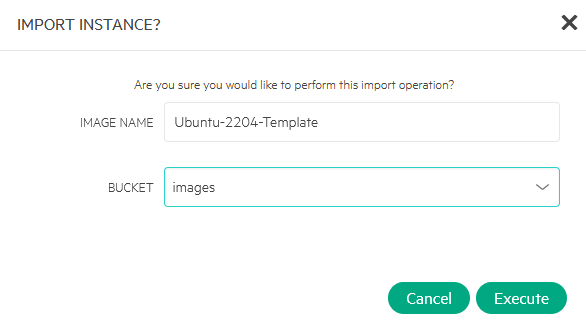
Put it on the NFS share, and click “Execute”. And after it’s done, we can see it here:

No way of tracking progress in the Management plane, as far as I can tell. I monitored the network traffic on the (vSphere based) VM’s and the files in the NFS-share, to see when it was done.
You can see when it’s done, by looking at the “status”. When it’s Active, it’s done.
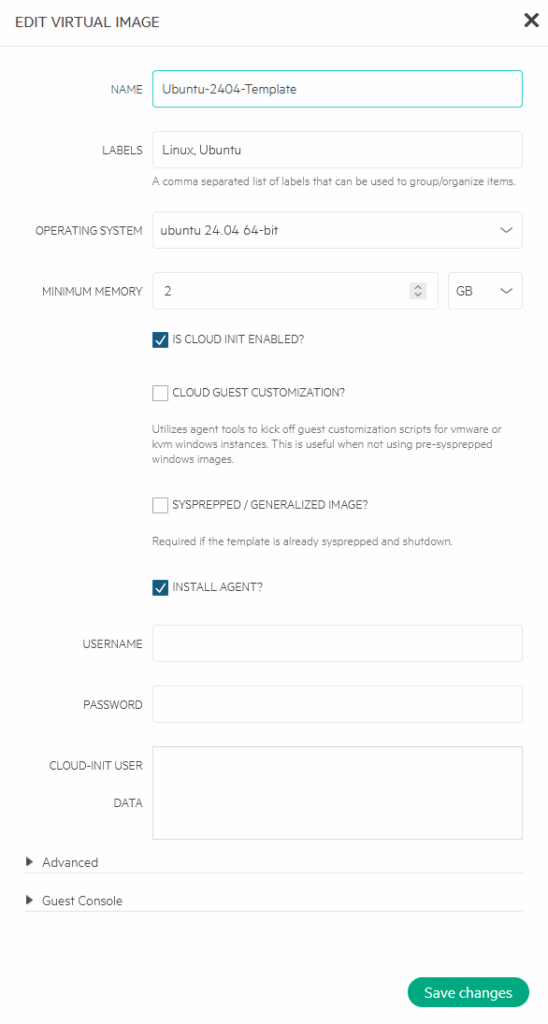
We can make some changes (add labels, select “Is Cloud Init Enabled” and set a minimum amount of memory):
Create new VMs
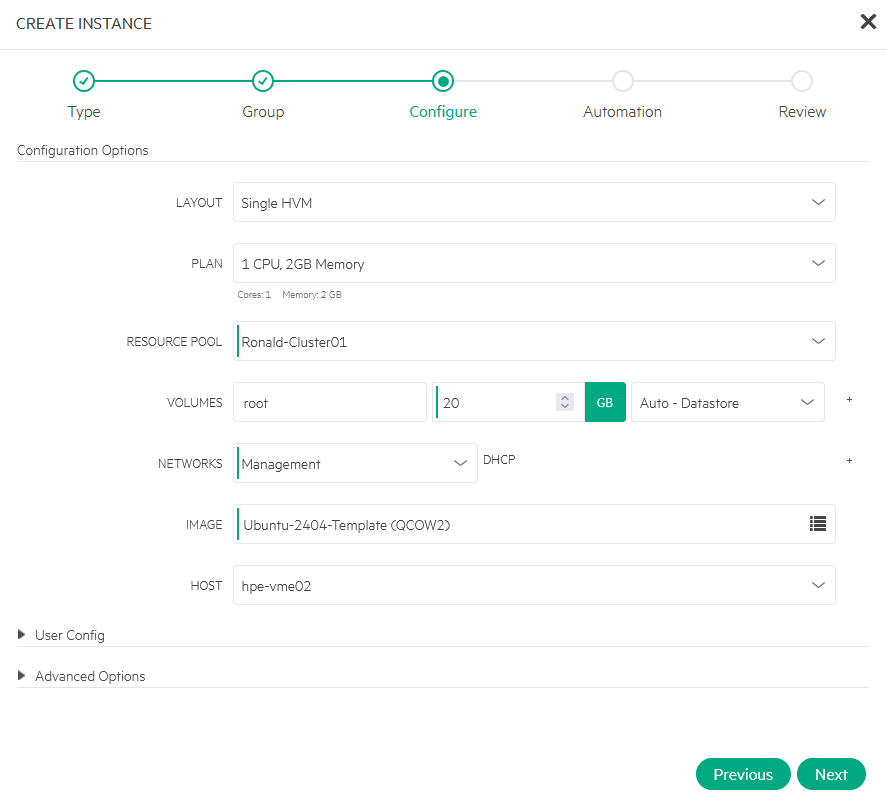
From the created template I am creating two new VM’s (Ubuntu01 and Ubuntu02), running on different hosts:
VM Failover
Now we’ll see what happens when I (virtually) kill one of the hosts that runs one of the Ubuntu VM’s. Since the placement policy of the VM’s is set to Automatic:

it should restart on another host.
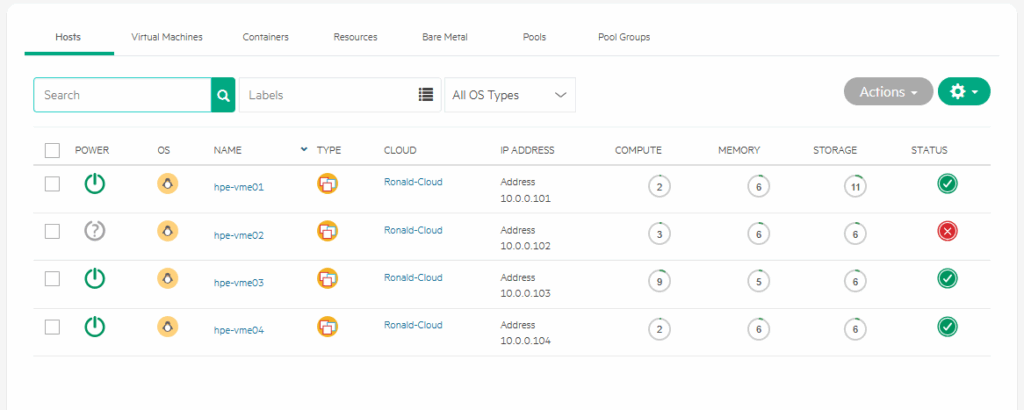
After powering down the host, it does take quite some time before the manager registers that. In my environment it’s several minutes (almost 4) , before I see:
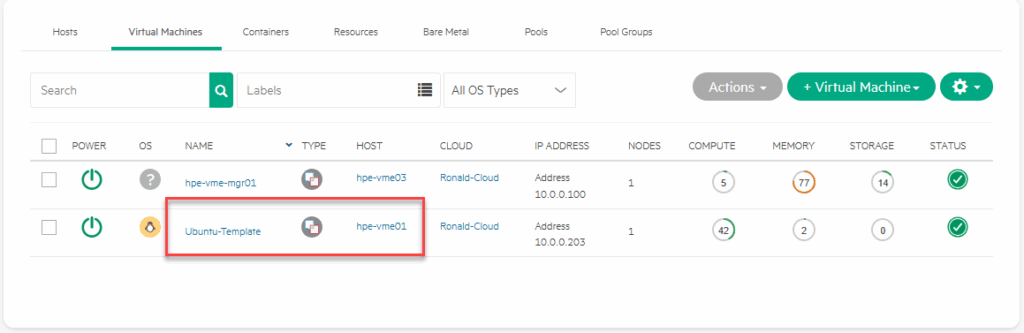
But when it does register this, the VM is restarted (I took the Template VM as an example, because of lack of storage, currently, but that will hopefully be resolved soon :)).
After powering on the failed host, it takes a couple of minutes to get registered back (a lot longer than I expected). It does report new metrics to the manager, but it does so intermittently. It is still considered to be Offline:
Eventually it took about 10 minutes before the host was registered back as provisioned again:

This time we are powering off the host that the VM had restarted on, to time the outage. In total it took 5,5 minutes from losing the first ping, to pings returning back to normal.
The start process of the Ubuntu VM is no more than a minute.
Final Thoughts
So, that concludes quite an extensive test with HPE VM Essentials. The whole process took me well over a week (of course not full time, but using available time where I could). One of the reasons for this is that I had to go back to the drawing board a few times and also had to restart. Part of that has to do with my unfamiliarity with Ubuntu Linux, part of that has to do with some lack of functionality from the GUI part of the product (or, again, my unfamiliarity with finding the right method to do things). So I rebuild the environment a couple of times (from scratch), which also helps in gaining a good feel for that part of the process.
I also ran into some issues with nested networking, which, of course, has everything to do with running in a lab environment. These issues would normally not occur when building this in production. I didn’t get VLAN-tagging working within the HPE VME environment, but I think there is some nested issue there, that I will try to resolve (and maybe write another blog about). But when I chose to just use the VLAN-tagging capabilities of the underlay (vSphere), the results were as expected.
All in all it was an interesting exercise. I learned a lot, also thanks to the documentation on the HPE website, but I must also conclude that there is a lot that can be improved there. Especially around explaining the different concepts and inner workings of the product.
From a functionality perspective, I would say it definitely has merits. I have not taken a very close look at the provisioning and automation part of the product (yet), which are reported to be it’s strengths (coming from the Morpheus acquisition), so I am not able to give any thoughts on that, but the basic virtualization functionality is there. You can create virtual machines, pretty easily and intuitively. You can move them around the cluster and if there is a failure, the VM gets restarted automatically. That said, it does take longer than I think most organizations would be happy with, but I must admit that that might be related to the nested nature of the lab.
Networking is (at least from what I have seen so far), pretty complex. It is not very easy to change existing configurations, like I am used to in vSphere. If I want to create new or change existing “port groups” or it’s equivalent, I didn’t find that easily. I assume it would mean going back to the individual hosts and performing the activities there.
Installation was not very difficult. Yes, there is the fact that you first have to install and configure Ubuntu and then install the VME software, but that was relatively easy.
So, the big question, is it an alternative for customers that are running (small) vSphere environments?
I would say, it might be ór it could become. For customers that are currently already running vSphere (or Nutanix, for that matter) with larger environments I would be hesitant to go “all in” into HPE VME at this point in time.
Of course, there is a cost component that is a huge factor, but cost is not just licensing. I remember discussing TCO at customers, back in the ’90, where I would have to explain that buying a computer and it’s software, would only account for approximately 25/30% of the “Total Cost of Ownership” of that computer and I would say that the same holds true here. Investing in people, processes, migration and everything else, would have to be made into a business case, to determine if this would be a valid way forward for an organization.
So, where dó I see customers adopting HPE VME? I think the current sweetspot would be organizations that are “starting” something new. Either a whole new company or maybe an existing company that would use HPE VME as a new, second (or third) virtualization platform. Maybe to test the waters, maybe to have it grow into more.
Please note, this is true for all my blog-posts, but want to stress this here, because there are some opions in this blog post. These are my personal opinions, it does not reflect (in any way shape or form) the view from my employer.
3 thoughts on “New Tech: VM Essentials – A more serious Deployment”
Hello, thank you for sharing your experiences—this is a very interesting post overall.
I’d like to add that I’m also running tests with the new HPE VME platform, and regarding the VLAN issue you mentioned, I ran into the exact same problem. It took me several hours to fully identify the root cause.
Basically, the issue occurs during the network setup in Ubuntu. In your case, VLANs 101, 102, and 103 were defined on bond3. This configuration is applied via Netplan, resulting in something similar to the following:
vlans:
bond3.vms.101:
id: 101
link: bond3.vms
bond3.vms.102:
id: 102
link: bond3.vms
bond3.vms.103:
id: 103
link: bond3.vms
Defining VLANs directly in Netplan creates a conflict with OVS (Open vSwitch), which is what KVM / HPE VME uses to handle VLAN tagging for virtual machines.
In summary, the solution was simply to remove all VLAN definitions from Netplan (this can be done using the hpe-vme tool). The only VLAN that should remain defined at the Netplan level, if required, is the Management VLAN.
Thanks for sharing and for adding this solution, much appreciated.