Holodeck Lab: Replacing Networking with pfSense
After the first blog I posted in this new series: https://my-sddc.net/holodeck-lab-building-the-lab/https://my-sddc.net/holodeck-lab-building-the-lab/, I am going to change some of the networking. The Holodeck itself comes with a pretty good way of containing the lab environment in its own bubble, and only having one entry point (the Holo-A-Router), but since this is in my own home environment, I don’t really need to control it in the same way.
I also want some more control over the entities that are in my lab environment and since I am not a big Linux guru (and also don’t have the ambition to become one), I prefer pfSense, to the combination of the Holo-A-Router and Holo-CB-01a (Cloud Builder appliance). Combined with the additional resources that are used by the two VM’s (especially the CB), I decided to try to replace all the functionality with a pfSense appliance (and, if needed with the Holo-Console VM).
I’ll go about this in the following order:
- Shutdown Holo-A-Router and Holo-CB-01a
- Install pfSense appliance
- Create Interfaces
- Create Routing
- Expose Holo-Console VM to my private network
- Create NTP configuration
- Create DNS configuration
- Create DHCP configuration
- Boot up hosts to see if it all works
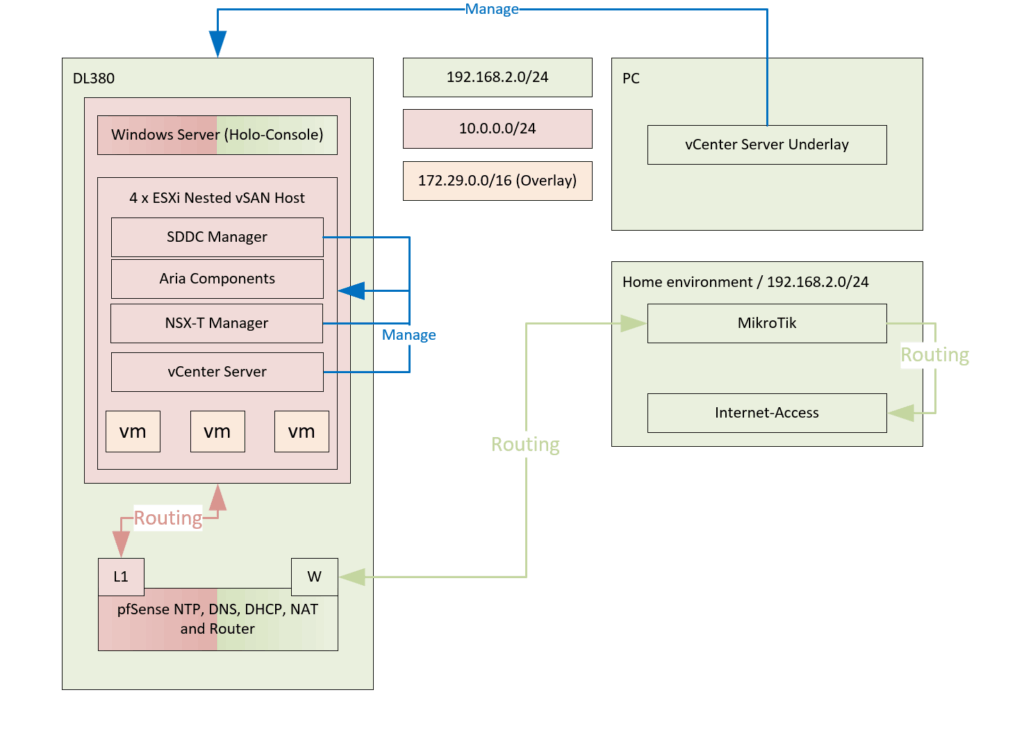
What I ultimately am going for, is the following:
First I can Shutdown Holo-A-Router and Holo-CB-01a and Install pfSense appliance:
Download from Netgate: https://www.pfsense.org/download/. Extract the .iso and upload it to my ESXi server. After that, create a VM with the following specs (and/or check: https://docs.netgate.com/pfsense/en/latest/recipes/virtualize-esxi.html):
- OS Family: Other
- OS Version: FreeBSD (64-bit)
- 1 vCPU
- 1 GB RAM
- 16 GB disk
- 3 Network adapters (for now): VMXNET3
- Home Network (1 adapter): One connected one connected for the WAN interface
- VLC-A-PG (2 adapters): Connected to the Holodeck network
- CD: Connect to Datastore ISO with installation medium (Connect at Power On):
and boot the VM, following the installation screens (not detailing those here).
After all is booted and I need access to the VM. Since the VM is only active on the Home Network (because I have DHCP there), I would like to be able to access it from there. That combined with the fact that I don’t need firewalling to block any traffic, I can go into the Console of the pfSense and do the following:
- Go to the shell (option 8)
- Run:
pfSsh.php playback enableallowallwan
(go to: https://www.onebyte.org/blog/2015/08/29/useful-pfsense-commands/) for more interesting commands to use in the shell)
This command will create the following firewall rules on the WAN interface, immediately opening it up from the Home Network:
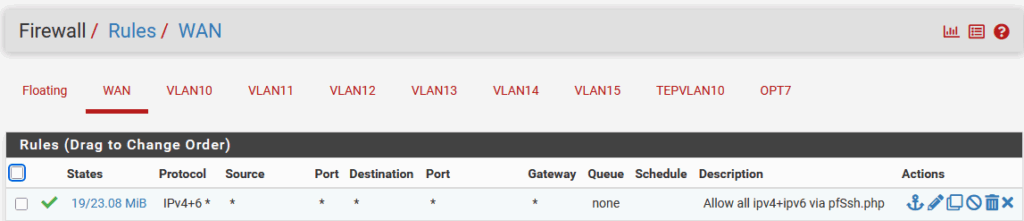
So after all is set and done, I am able to connect on the Home Network (in my case on 192.168.2.249/24).
Create Interfaces
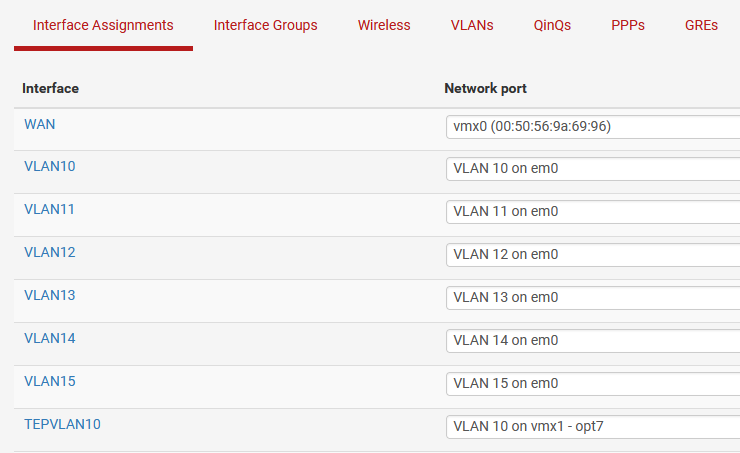
From there I am creating all the interfaces. First create all the VLAN’s:

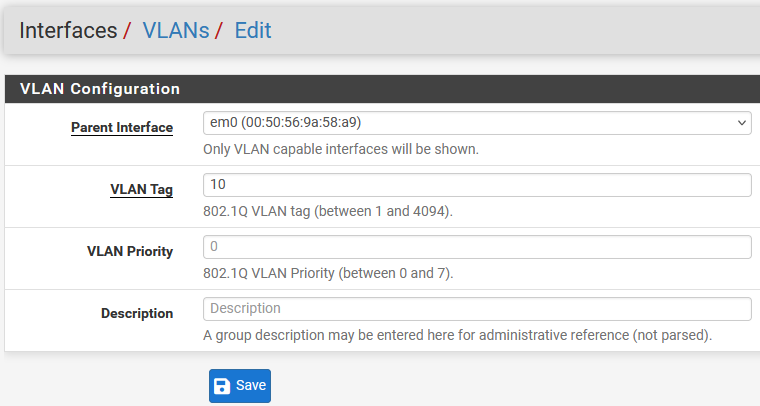
Note that VLAN 10 was created twice. Once on em0 and once on vmx1 (I used one E1000 interface and one VMXNET3 interface in the process of some troubleshooting and didn’t want to revert back, but you can use all VMXNET3 if preferred.
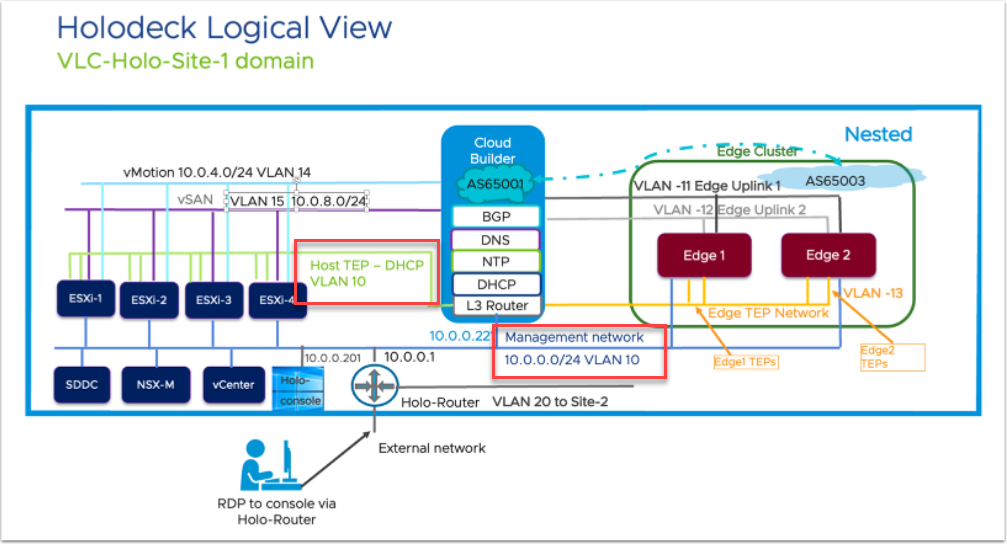
The reason for the two physical interfaces ánd the two VLAN10’s is that the Holodeck is making use of two VLAN 10 networks. One for the management-network and one for the TEP-network for the hosts. And since I will be needing both on the pfSense, I am using two interfaces. See here the picture in the Holodeck documentation:
I create multiple interfaces, this is an example of the VLAN10 interface. First create a VLAN (connected to the right Parent Interface, which is important to note):
After creating the VLAN, I assign the VLAN as a new interface to the list of available interfaces:
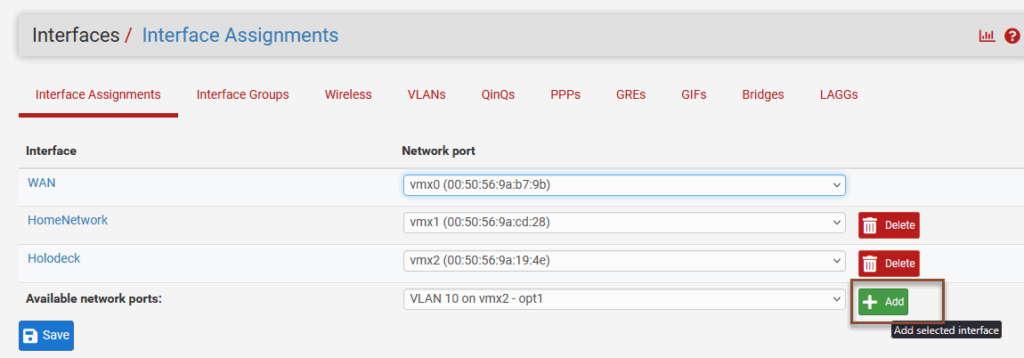
And (clicking on the newly created interface), configure it with the IP address:
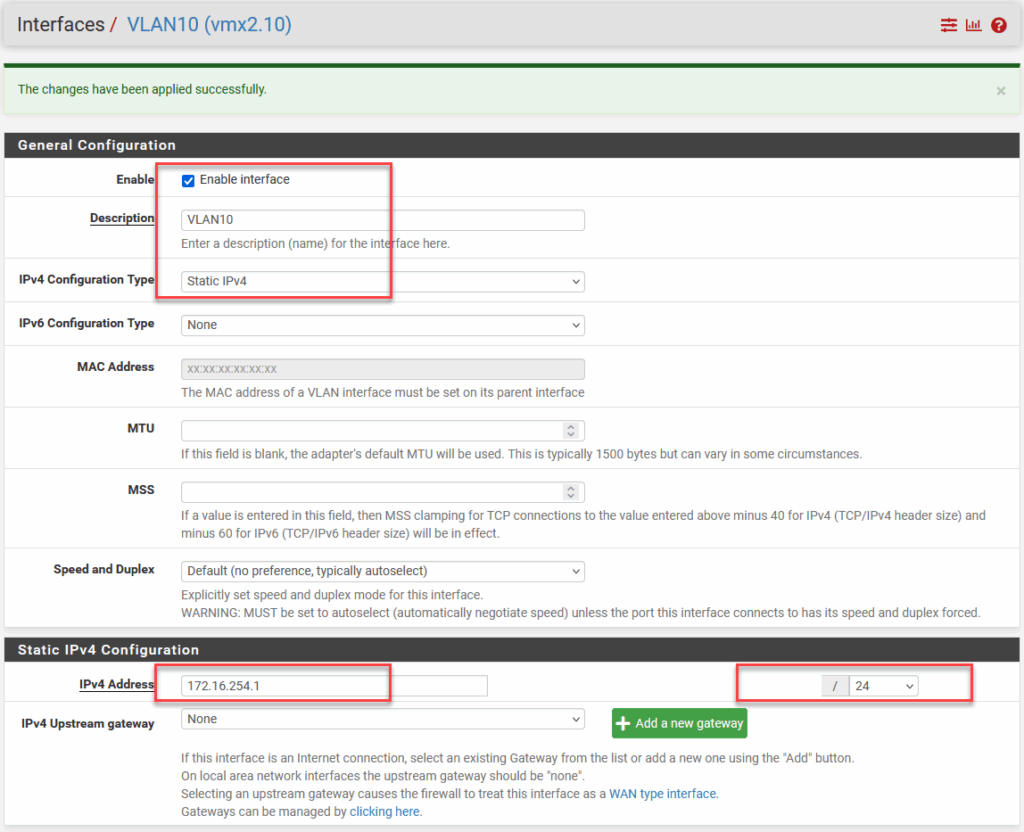
All the interfaces I created:
WAN: Home Network 192.168.2.249/24VLAN10 Management Network 10.0.0.1/24VLAN11 Edge Uplink Network 172.27.11.1/24VLAN12 Edge Uplink Network 172.27.12.1/24VLAN13 Edge TEP Network 172.27.13.1/24VLAN14 vMotion Network 10.0.4.253/24VLAN15TEPVLAN10 Host TEP Network 172.16.254.1/24
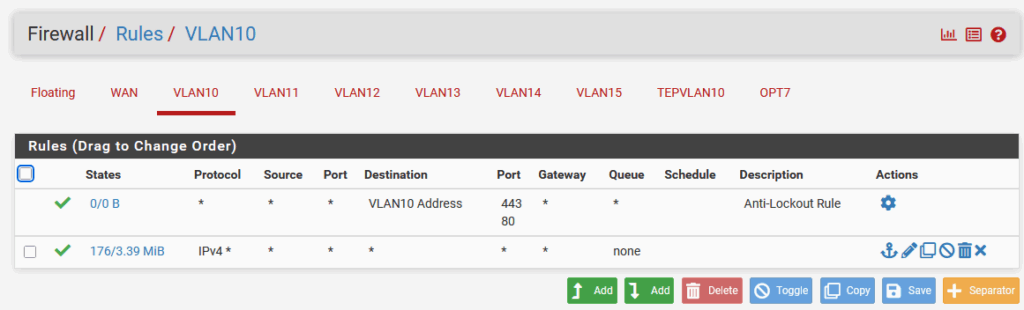
After creating all these interfaces and setting an IP Address on them, I need to create firewall rules to allow traffic through them. So I had to create rules on all the interfaces to allow all traffic (the second rule in this example):
If you do not want to use NAT, you can also Disable Firewall altogether, like this:
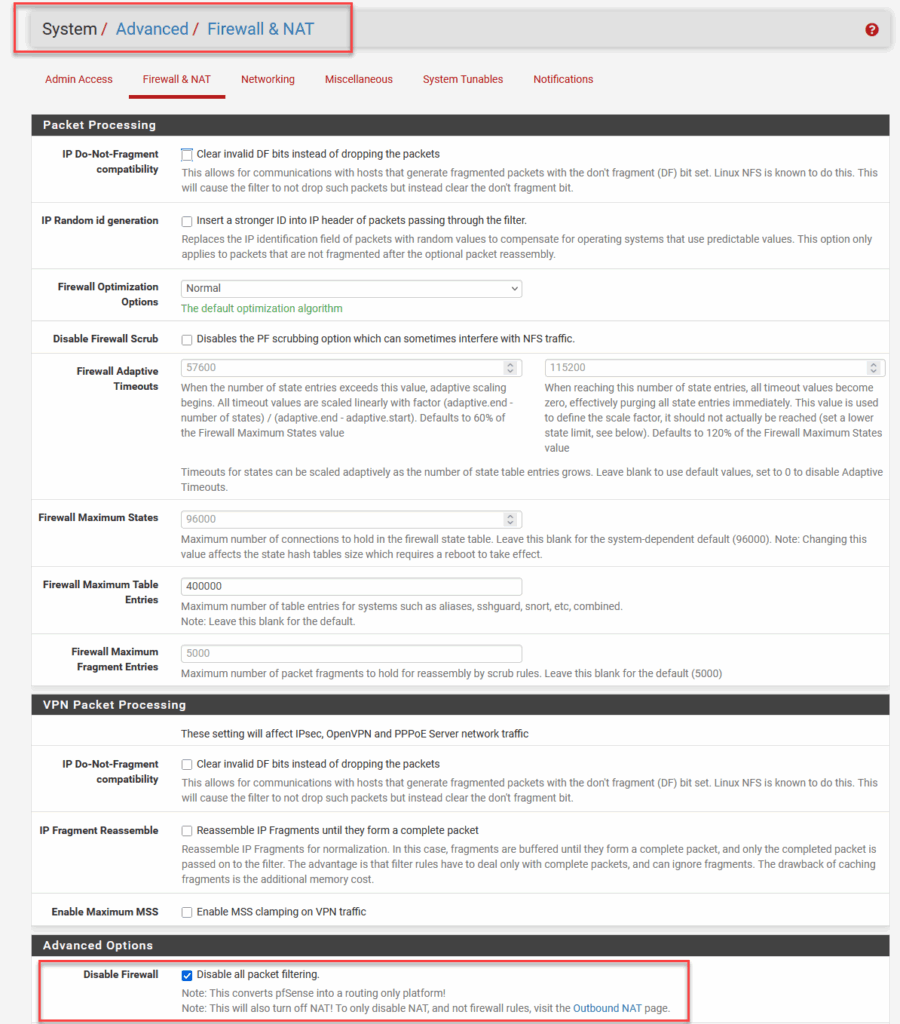
But I do want NAT, so I create all the rules.
Create Routing
With the creation of the interfaces, routing is automatically activated between the networks.
Expose Holo-Console VM to my home network
Now I want to expose the Holo-Console VM (10.0.0.201) to my home network, and only expose it to my PC (192.168.2.51). And I want this to work when I connect RDP to my WAN-interface (192.168.2.249).
For this I create a NAT Rule, like so:
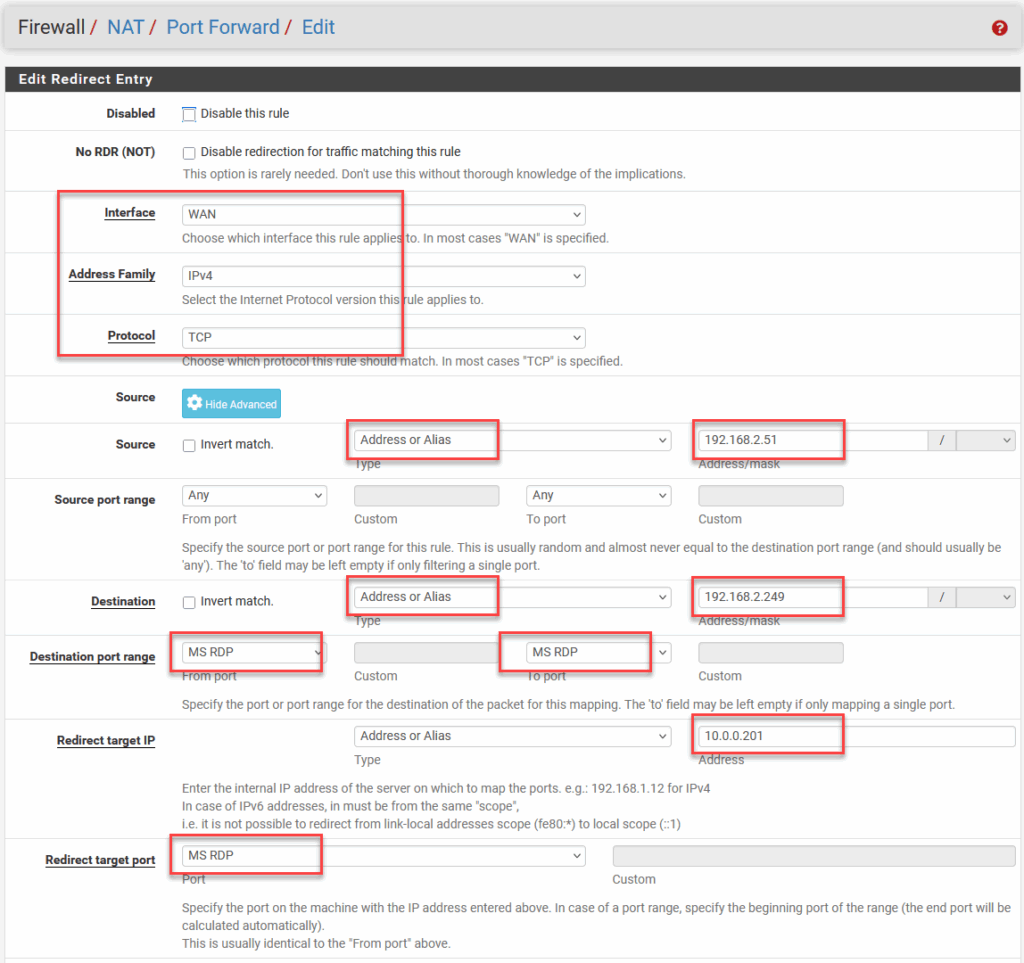
And after that I can access RDP from my PC to my Holo-Console. Woohoo…
Create NTP configuration
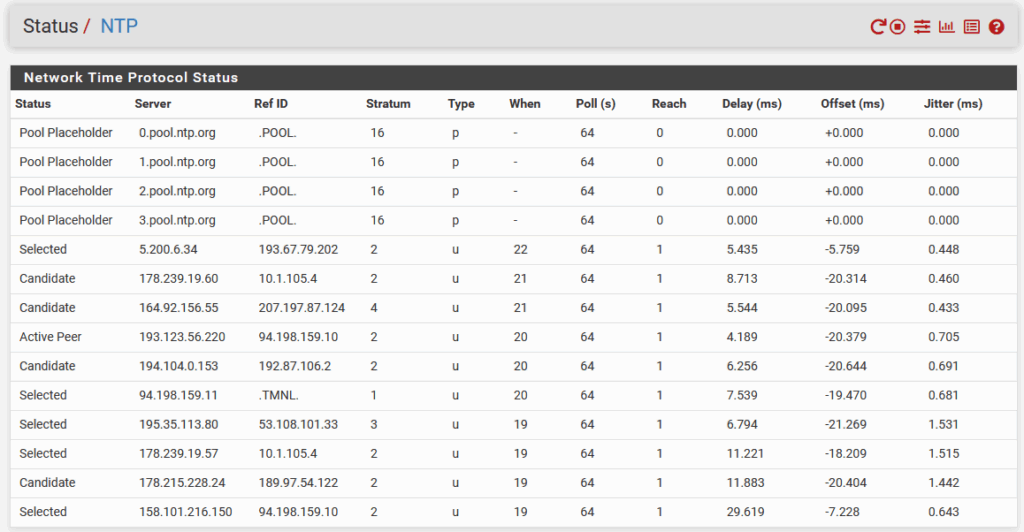
Activating NTP is fairly simple. You go the “Services / NTP” from the menu and fill out the Settings:

I kept it as default as possible. Only using specific upstream NTP Servers, the rest is kept as it was.
After doing this, check the Status:
Create DNS configuration
For DNS I am going to use the “Bind” package. You can install that from:
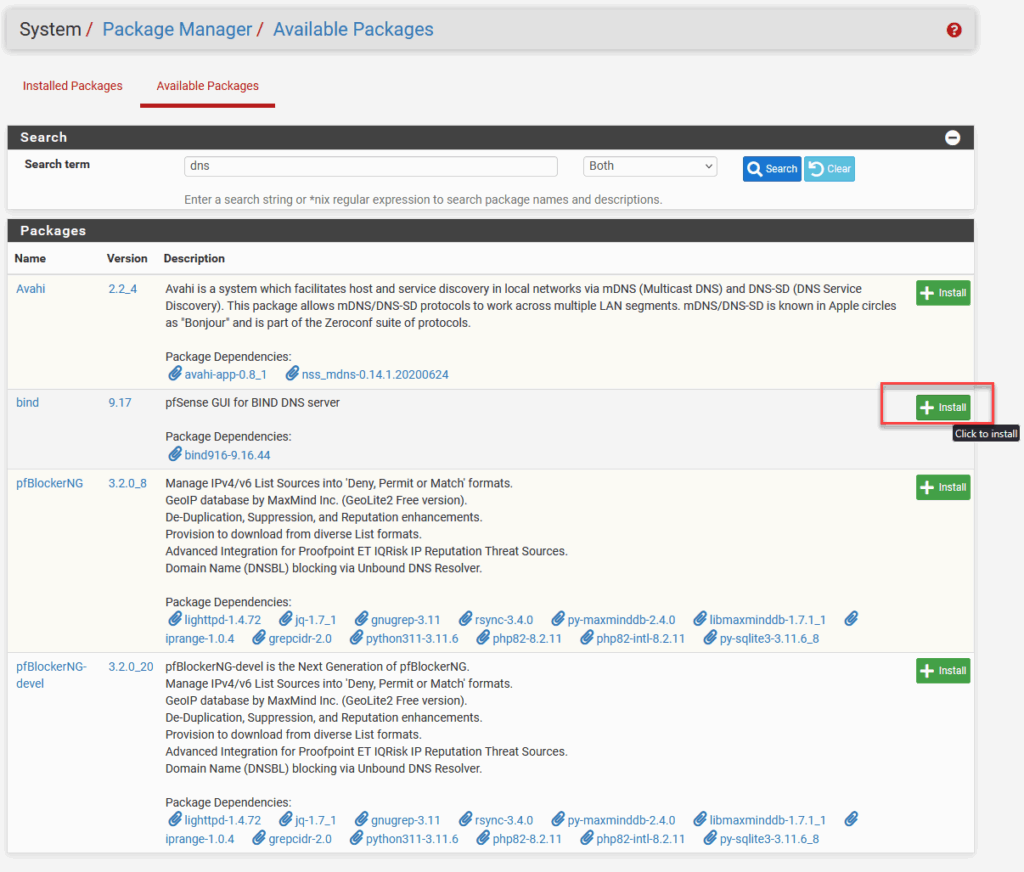
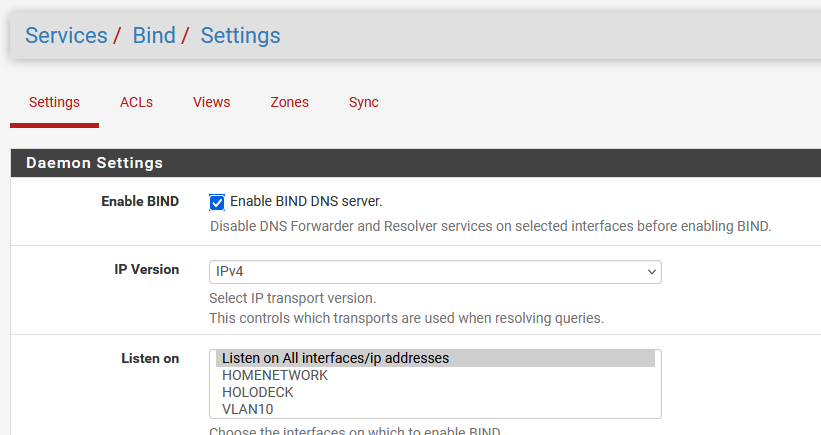
After this has completed, the configuration can be done through: “Services / Bind / Settings”. In only changed a few settings:
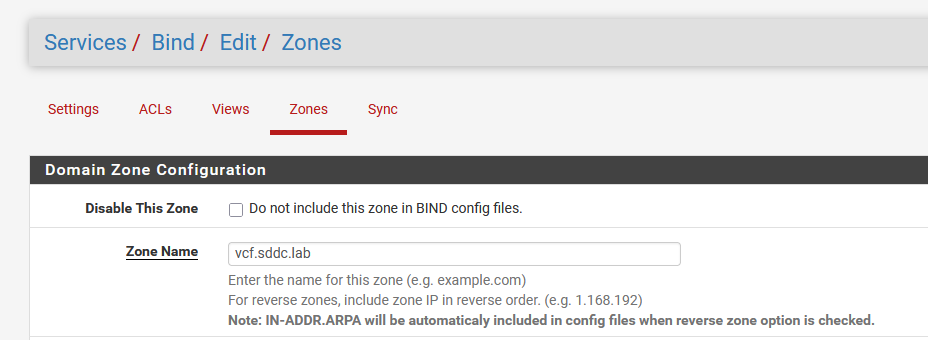
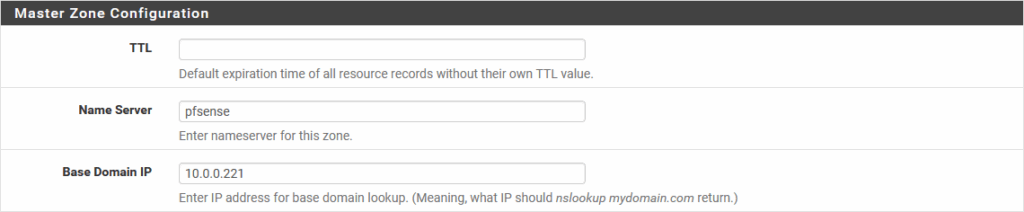
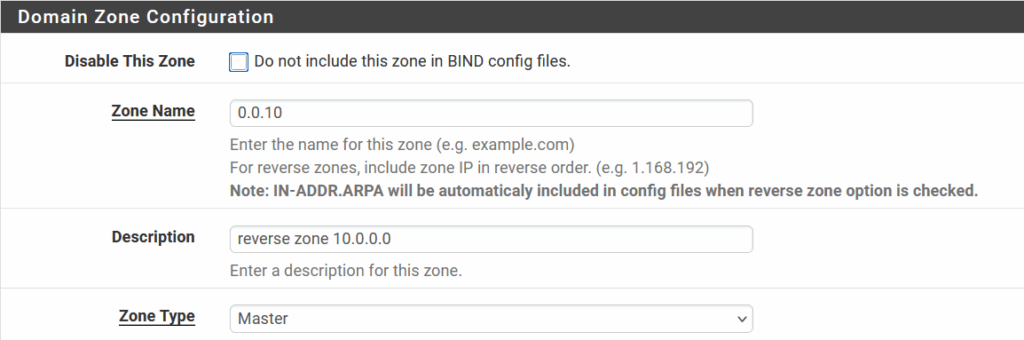
After this, we can create a zone for the vcf.sddc.lab environment:
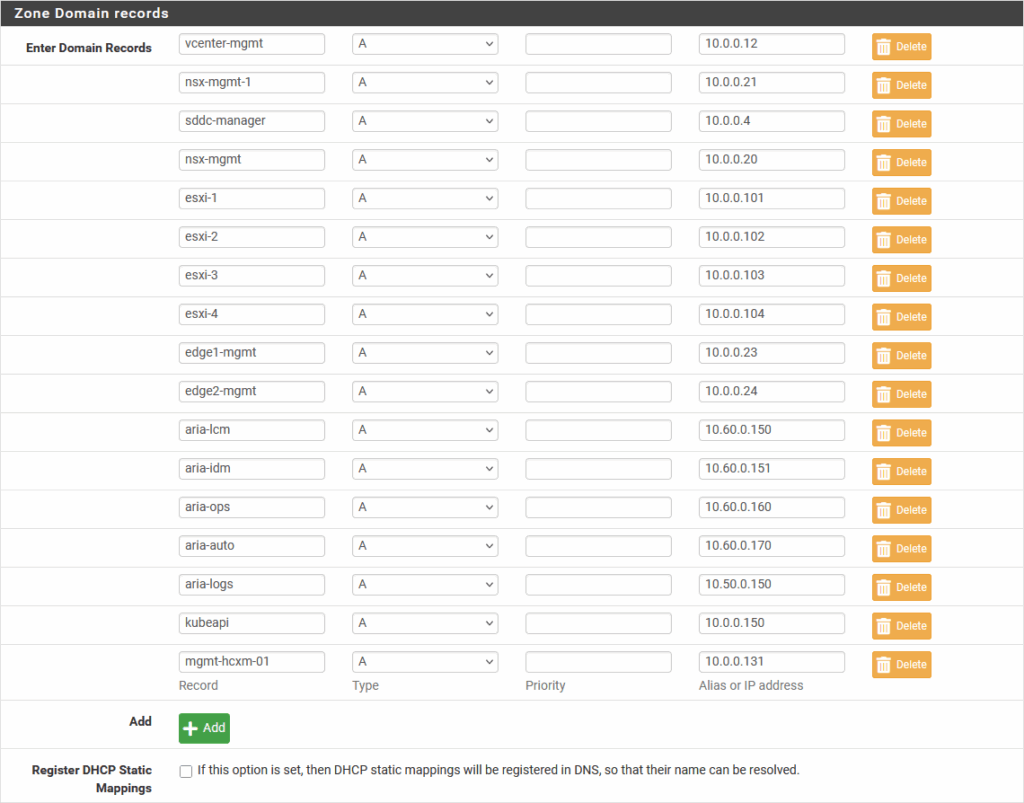
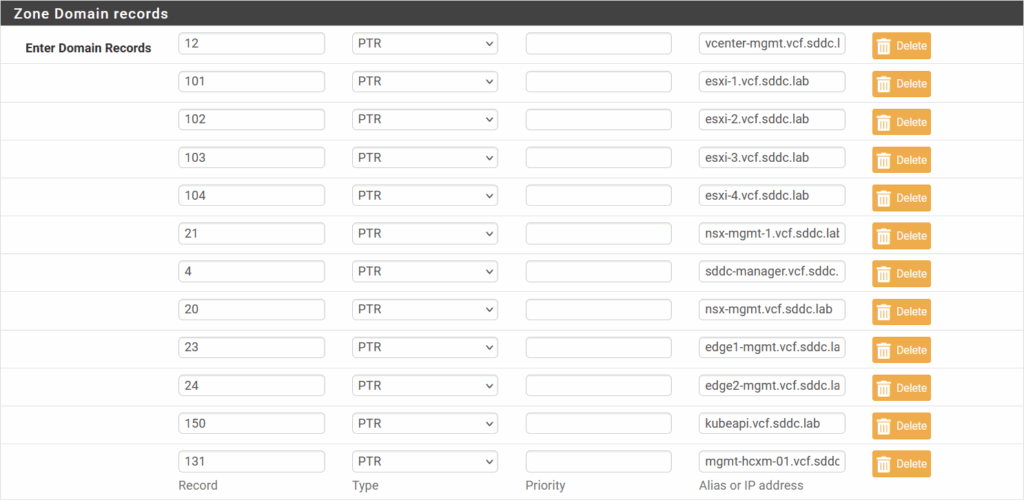
And create the necessary records:
And also a reverse lookup zone, for the 10.0.0.0/24 network, to make sure reverse records can be found as well:
For all this configuration, I used: https://geekistheway.com/2023/03/18/configuring-dns-bind9-on-your-pfsense/ as a reference.
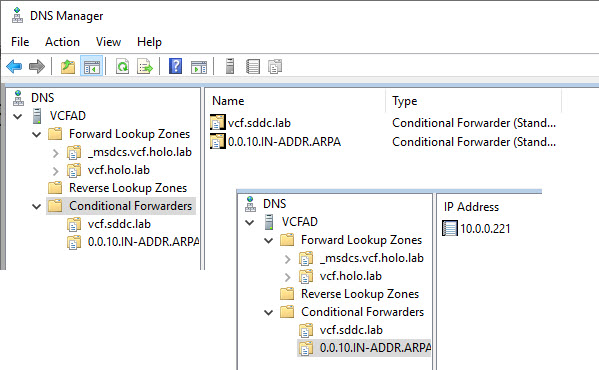
And after that, I configure a conditional forwarder on my Windows based DNS-server, to use 10.0.0.221 for any addresses in the “vcf.sddc.lab” zone ánd the reverse lookup zone 0.0.10.in-addr.arpa (general forwarding is done to my pi-hole appliance):
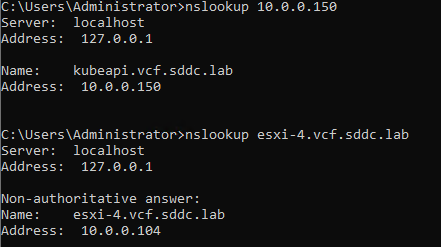
And try it out:
Create DHCP configuration
Next up, DHCP. Especially for the TEP-network in which the ESXi hosts will operate. So that is VLAN 13 in my case.
First we have to change from ISC DHCP to Kea DHCP, since the former has been deprecated. This we do in:
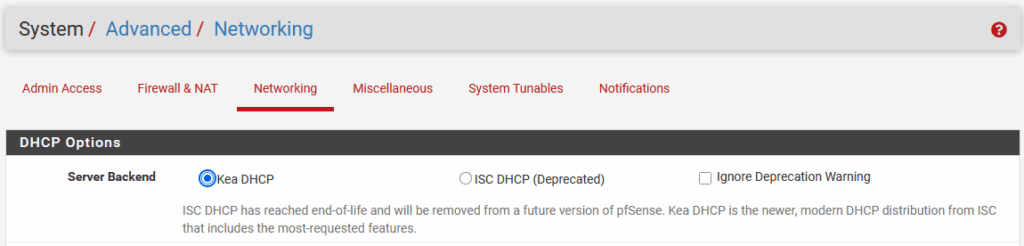
After that, we can go configure DHCP on VLAN10:
Please note, the picture in the Holodeck documentation might be a little confusing, in a way that VLAN 10 is both used for the “Management Network” and the Host TEP network):

This means that the VLAN is being used for both purposes. This is something that is to be addressed during the build of the environment. I might try to revisit this later, but for now, it is what it is. So we are adding DHCP to VLAN10 on a different physical interface (like described when creating interfaces).

After this, I can power on one my ESXi hosts, to start testing the functionalities I have added so far.
Boot up hosts to see if it all works
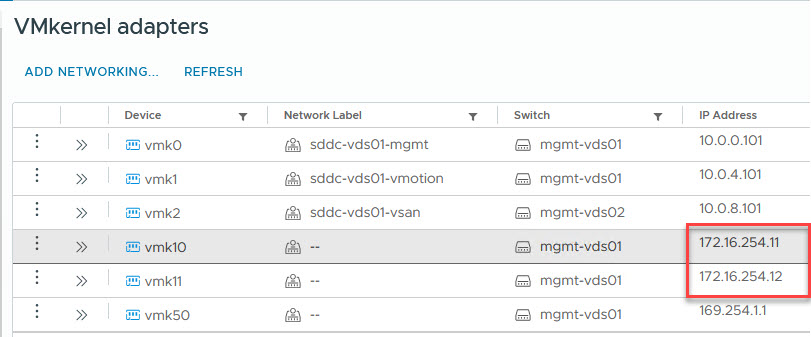
So, after booting up the hosts, I can see that I get addresses ánd that DNS is functioning. Same for routing:
Next up, getting BGP to work. That is something for another Blog.
4 thoughts on “Holodeck Lab: Replacing Networking with pfSense”
where did the em0 interface come from? Is there a step missing? or was it in the first blog? I have vmx0, 1 and 2. I understand what i’m trying to replace. All I have is 3 nic’s in pfsense…i’m sorry for being dense.
Hi Chris, sorry for the late reply, if I recall correctly that is an interface that you get if you add an e1000 adapter. But not entirely sure and currently on holiday, so no possibility to check the lab :).